Cherry Pie
This post may contain affiliate links. As an Amazon Associate I earn from qualifying purchases. Please read my disclosure policy.

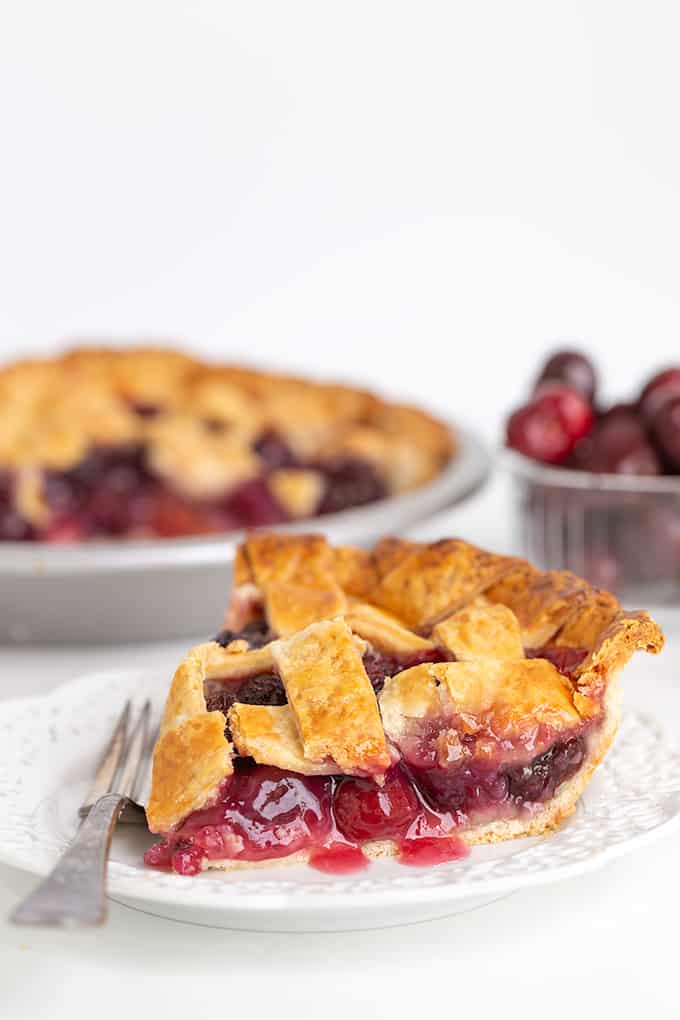
This Cherry Pie Recipe with the lattice pie crust is the perfect way to use up fresh cherries! It tastes so much better than the canned pie filling and I love seeing the cherries peeking out of the pie crust. Almond extract is added to give it a little extra flavor, but can easily be omitted too!
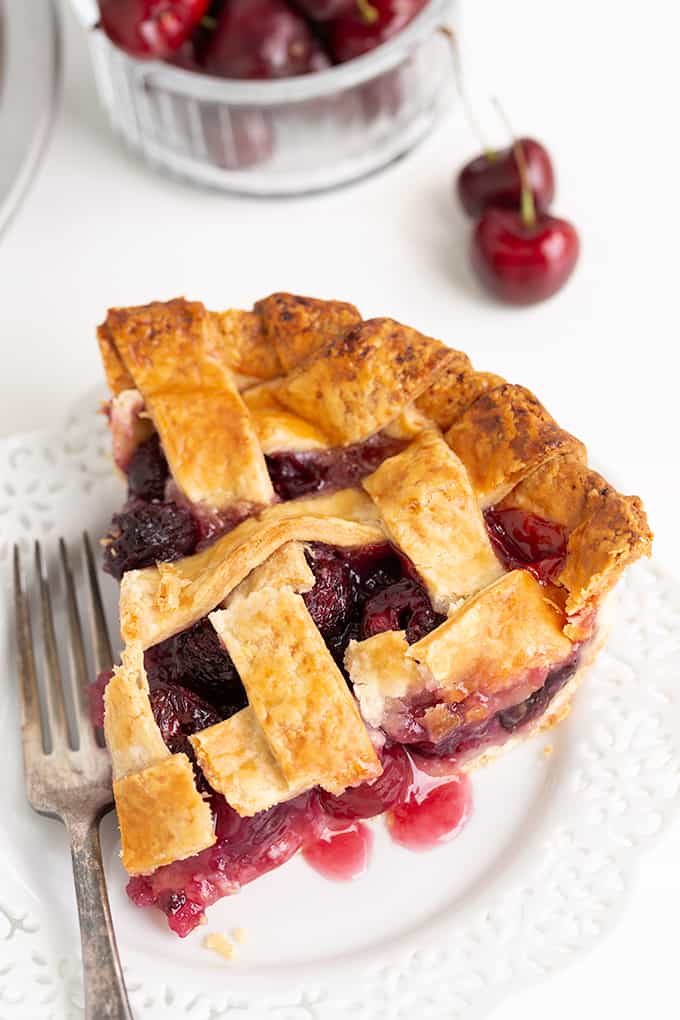
My goodness I love cherry pie! Who here is with me? That sweet, sticky, bright red cherry filing is just too hard to resist. A nice slice of homemade cherry pie is one of my go-to summer desserts.
How to Make a Cherry Pie
Making a perfect cherry pie is super easy. I like to make the filling for the cherry pie first and then let the cherries sit to marinate in the sugar. This helps extract the liquid from the cherries, making the pie juicier.
Here is a quick look at how I make my cherry pie filling:
- Mix the lemon juice and almond extract in a large bowl.
- Add the pitted, whole cherries to the bowl and toss them in the lemon juice mix.
- Add the sugar and cornstarch to the bowl and toss the cherries again, coating them completely in the sugar and starch.
- Let the cherry filling sit, stirring it occasionally, while you prepare the pie crust.
That’s it! I told you it was easy. Sometimes the simplest recipes are the best!
The fresh cherry pie filling goes into an unbaked pie crust that is topped with a lattice pie crust. I will talk a little bit more about making a lattice crust in the next section.
I like to use store-bought pie crusts when I’m short on time. Most frozen pie crusts you find in the grocery store will bake very flakey and taste delicious.
If you want to make your own pie crust, you definitely can! Make a double batch of pie crust so that you have enough for the bottom crust and the top lattice.
How to Make a Lattice Crust
Lattice pie crusts are quite beautiful. They are especially pretty when the bright red cherry pie filling pops through the top. A lattice crust can be a little tricky to make but, once you have done it a few times, you will become a pro!
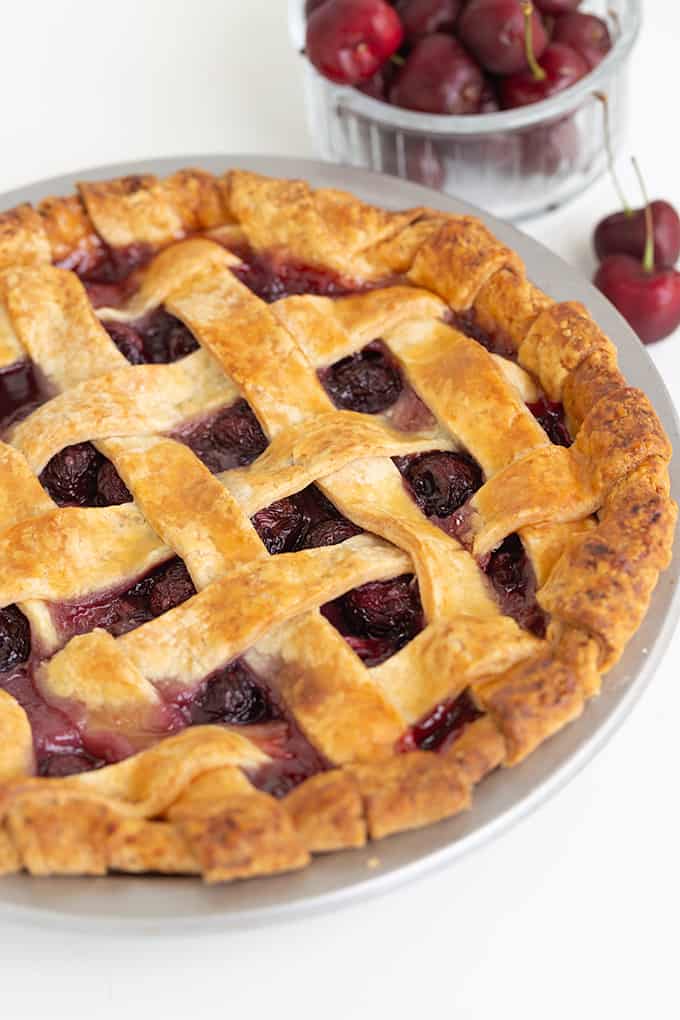
Here is how I make my lattice crust:
- Cut a rolled-out 9-inch round pie crust into one-inch wide strips.
- Lay one strip at the very left side of the pie crust, placing it vertically so it goes up and down the edge of the pie.
- Lay a second strip of pie crust across the top of the pie, placing it horizontally. This strip will be over the top corner of the first strip you added to the pie.
- Next, take a third pie crust strip and place it vertically down the pie again, laying it one inch away from the first strip. You should now have two vertical strips and one horizontal strip of pie crust on top of your cherry pie. Now, the horizontal strip should be on top of the first vertical strip and under the second vertical strip.
- Place a second horizontal strip one inch lower than the first. Tuck the left end of the second horizontal strip under the first vertical strip. You should start to see a basket pattern in the lattice.
- Continue to alternate adding vertical strips and horizontal strips, weaving the new strip over and under the ones already on the pie.
If you want a simpler pie crust top, you can roll your crust into a large circle and then place the whole crust on top of the pie, covering the filling completely. Cut an X into the center of the top crust with a large knife. This simple top will give you a delicious flakey top crust without the work of a lattice. However, I am biased toward how a lattice crust looks on a cherry pie- it is just so pretty!
How Long Does Cherry Pie Last
After you have baked this cherry pie recipe, you can store it covered at room temperature for 3-4 days. Store the pie in the fridge to make it last for up to a week. My cherry pies never stick around longer than this anyway!
I prefer to store cherry pie at room temperature to keep the crust flakey. Sometimes the fridge can make the crust a little soggy but it will still taste great, just have a softer texture. Both storage methods will work!

Frequently Asked Questions
How long to bake a cherry pie?
My cherry pie bakes for about 20 minutes in a 400-degree F oven then is reduced to 375 degrees F and continues to bake for about 1 hour. Once the pie filling begins to bubble and the crust is golden brown, the pie is done!
Does cherry pie need to be refrigerated?
Cherry pie will keep at room temperature for about 3-4 days. Any longer than that and it should be refrigerated. Cherry pies are very moist so they may start to get moldy after too many days at room temperature. Wrap the pie well and refrigerate it if you plan on keeping it for more than 4 days.
Can you freeze cherry pie?
You can freeze cherry pie! Let the pie cool completely and then wrap it tightly in plastic wrap. Place the pie carefully into the freezer, keeping it face up so the filling doesn’t spill. Freeze the pie for up to 2 months. When you are ready to enjoy the pie, place it in the fridge to thaw for 24 hours. Then enjoy it cold or reheat the pie in the oven to warm it up.
Can I use frozen cherries?
You can use frozen cherries in this recipe. I would recommend thawing the cherries first and discarding (or saving for another recipe) the cherry juice. Frozen cherries will have a lot more juice than fresh cherries and you do not want an overly watery pie.
You can also keep the juice from the thawed cherries and simply add about 1 tablespoon more cornstarch to the recipe to help it thicken.
Why is my cherry pie runny?
The biggest reason behind runny cherry pie is that the pie didn’t bake long enough. The cherry pie filling needs to be bubbling in the oven before taking the pie out. If the filling doesn’t reach the boiling point, the cornstarch will not thicken the filling and it will end up runny. Be sure that your filling is bubbling over the edges of the pie before removing the pie from the oven!
More Homemade Pies To Try:
This cherry pie recipe is so easy and tasty that it is sure to be a family favorite.
Cherry Pie
SAVE THIS RECIPE
Ingredients
Pie
- 2 pie crusts, homemade or store-bought
- 1 cup granulated sugar
- ⅓ cup cornstarch
- 4 cups pitted cherries, roughly 75 to 80 cherries
- 1 tablespoon fresh lemon juice
- ½ teaspoon almond extract
Egg Wash
- 1 large egg
- 1 tablespoon water
Instructions
Pie
- Preheat the oven to 400 degrees F.
- Place the first crust on a lightly floured surface. Roll the dough out into a 12-inch circle.
- Once your circle is rolled out, fold the dough in half, pick it up, and place it into a 9-inch pie plate. Unfold the dough and gently push the dough into the bottom and sides, working out all of the folds.
- In a bowl, add the ⅓ cup cornstarch and 1 cup granulated sugar. Stir until incorporated.
- Add the4 cups pitted cherries to a large bowl. You can slice them in half if you want, but I like to keep them whole.
- Add the 1 tablespoon fresh lemon juice and ½ teaspoon almond extract.
- Pour the sugar and cornstarch mixture on top of the cherries and stir until evenly distributed.
- Let the mixture sit for about 15 minutes to let the juices release from the juices.
- While the cherry filling is resting, work on the top pie crust.
- Roll the dough out into about a 12-inch circle on a lightly floured surface.
- Cut 1-inch wide strips all the way across the circle with a pizza cutter.
- Stir the cherry filling until coated with the sugar and cornstarch mixture again and then pour into the pie crust.
Egg Wash
- In a small bowl, add the 1 large egg and 1 tablespoon water. Whisk until thoroughly combined.
- Use a pastry brush and brush the egg wash on the edges of the pie crust.
- Start placing strips of pie dough on the cherry filling. I always grab the longest pieces and place them in the middle to form a plus sign. Then I work my way outwards with the strips of pie crust interlacing the pieces.
- To weave the pieces, fold every other piece of crust back and then lay the new strip on top of the remaining pieces. Unfold the strips and fold the ones that are now underneath the strip you just placed down. Repeat until the pie crust covers the top of the pie.
- Gently press down the pieces on the edge of the crust and cut off any dough that hangs farther than ½ inch off the edge of the pie plate.
- Fold the ½ inch overhang underneath the bottom crust and crimp the edges.
- Place in the 400 degree F oven for 20 minutes and then reduce the temperature to 375 degrees F. Allow it to bake for an additional hour or until the filling appears thick as it bubbles around the lattice crust.
- Remove from the oven and allow to cool completely. Slice and serve.
- Cover with plastic wrap and store in the refrigerator.
Notes
Nutrition
(Nutrition facts are an estimate and not guaranteed to be accurate. Please see a registered dietitian for special diet advice.)