Ugly Sweater OREO Cookie Balls
Christmas OREO cookie balls taste amazing and are SO fun to decorate. Learn how to make the Ugly Sweater OREO Cookie Balls with a chocolate OREO cookies, cream cheese, and melted baking chocolate.
This shop has been compensated by Collective Bias, Inc. and its advertiser. All opinions are mine alone. #CookieBallCountdown #OREOCookieBalls #CollectiveBias

Who doesn't love a double chocolate cookie ball? I opted for a chocolate OREO cookie because double and triple chocolate is what does well on my site. Take a look at my Triple Chocolate Cheesecake or Mile High Chocolate Cream Pie! Everyone goes crazy for them. While you're at Walmart, grab whatever flavored OREO cookie you prefer and look for a special savings offer on Family Size OREO cookies!

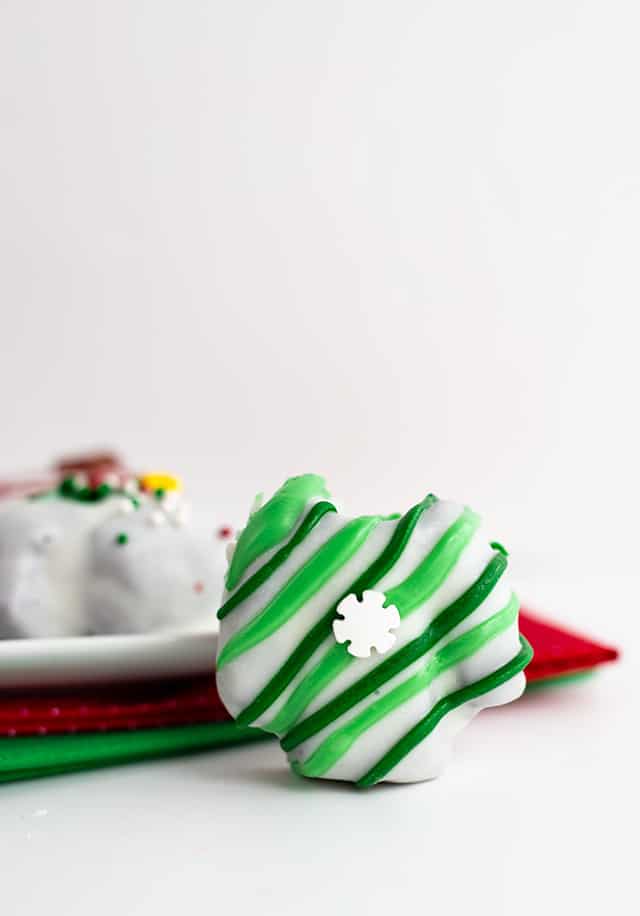
I tried to make some really hideous ugly sweater OREO cookie balls, but they just came out looking ridiculous. I went with some eye-pleasing ugly sweater designs instead. Stripes, zig-zags, and lots of sprinkles is the key to these ugly sweater cookie balls.

How to make OREO Cookie Balls
These OREO cookie balls are so easy to make and everyone wants easy during the busy holiday season! The hardest part is deciding what design you want to go with. The tools you'll need to make the OREO cookie balls are:
- food processor
- hand mixer
- small knife
- toothpick
- 1 or 1 ½ tablespoon cookie scoop
Start by adding the chocolate OREO cookies into the food processor and pulse until all you have are cookie crumbs. Dump the crumbs into a bowl and add a brick of softened cream cheese to the cookie crumbs.

Using a hand mixer, beat until the cookie crumbs and cream cheese is thoroughly incorporated and a large OREO cookie ball forms.

Grab the cookies scoop and scoop the cookie balls out. I used a 1 ½ tablespoon cookie scoop. Roll the cookie ball between your two palms until a ball forms. This is mostly just to make the ball smooth. Press the ball flat, but thick and start pressing the sides into a rectangle shape.
Make the top of the sweater more rounded. You should have what looks like a tombstone at the point. Grab a small knife and cut a square out of the bottom corners of the OREO cookie pop. Don't take too much otherwise you'll have a t-shirt instead of a sweater.
Use a toothpick to clean up the edges that were just cut. Place the toothpick straight up and down on the corner that was just cut for the sleeve. Press down and leave a deep indentation. If you want a neck hole for the sweater, use a piping tip and cut a half circle out of the rounded top.
For a firmer OREO cookie ball to dip, place it in the freezer on a cookie tray for 10 minutes. I left mine soft because I didn't want the chocolate to firm up immediately.
How to color melted chocolate
To make the melted chocolate different colors, I used candy colors that are oil based. Stir the candy colors right into the bowl of melted white chocolate and add into a sandwich bag. You won't be able to color semi-sweet chocolate with the candy colors.

Add as much or as little of the candy colors as you want to get the perfect color of white chocolate. They will cool pretty quickly and harden.
If you find that your colors have hardened, grab a small microwave-safe bowl and add the sandwich bags in with the cut corner pointing up. I sit them in the bowl in an "L" shape to make sure the baking chocolate doesn't run out and microwave for 15 - 20 seconds. If the chocolate is still hard, try another 15 - 20 seconds. Use your fingers to move the chocolate around to make sure there are no hard lumps in the bag.
Now you're ready to use your bags of colored melted chocolate again!

How to Dip OREO Cookie Balls
Dip the cookie balls in the white melted chocolate. I like to use a fork and a skewer to dip the cookie balls and place them on wax paper. The fork allows the excess chocolate to drip off and the skewer helps to carefully push the OREO cookie ball onto the wax paper and off the fork.
PRO TIP: I like to twist the skewer as I'm pushing the cookie balls off the fork and onto the wax paper to help keep the chocolate on the cookie ball and the cookie ball from sticking to the skewer.
Decorate the Ugly Sweater OREO Cookie Balls
Once the ugly sweater OREO cookie balls are on the wax paper and coated with the melted chocolate, grab those sandwich bags full of colored chocolate and start decorating. If you plan on adding sprinkles too, work quickly to add the colored frosting and sprinkles before the ugly sweater hardens.

To achieve the tangled lights look your ugly sweater, let the chocolate cool slightly. As it cools, it will maintain its shape when it's piped. If it gets too cool, it will be impossible to pipe because it's too thick. Try warming up the chocolate and starting over.
FAQs
Do OREO cookie balls need to be refrigerated? Yes!
Can OREO cookie balls be frozen? Yes! The chocolate may crack in thawing especially on the counter, so try thawing them in the fridge.
How long do OREO cookie balls keep? They'll keep in the fridge in an airtight container for 1 month or in the freezer for 4 months.

Ugly Sweater OREO Cookie Balls
Ingredients
- 1 (8 oz.) brick cream cheese softened
- 36 OREO Cookies Chocolate finely crushed about 3 cups
- 16 oz. white baking chocolate melted
- red and green candy colors
- holiday sprinkles
Instructions
- Mix cream cheese and cookie crumbs until incorporated.
- Using a 1 ½ tablespoon cookie scoop, scoop cookie balls into your hand.
- Roll the cookie balls between your two palms until smooth.
- Flatten the ball out and shape it into a thick tombstone shape. The top of the sweater will be rounded, the sides flat and the bottom flat.
- Cut small squares out of the bottom corners of the cookie ball. The arched side is the top of the sweater.
- Use a toothpick to tidy up the edges that were just cut.
- Line the toothpick straight up and down from the edge of the small corner that was just cut. Press down to form the sleeve and leave a deep indentation.
- Freeze 10 minutes for a firm cookie ball to dip and if you want the melted chocolate coating to harden quickly.
- Dip balls in melted chocolate; Tap off the excess chocolate and place in single layer in shallow waxed paper-lined pan.
- Color a small amount of the melted chocolate red and green using candy colors.
- Add the colored chocolate in a sandwich bag and cut a small hole in one of the corners of the bag.
- Stripe the sweaters with the colored candy melts and add sprinkles.
- For a zig-zag look, drag your toothpick up and down the wet chocolate that has been striped with colored chocolate.
- To make tangled lights, let the colored chocolate cool slightly so it holds its shape. Pipe it in the center of the sweater and add nonpareils to it.
- Refrigerate for 1 hour or until firm.
- Share and enjoy!
Nutrition
(Nutrition facts are an estimate and not guaranteed to be accurate. Please see a registered dietitian for special diet advice.)

