Red Velvet Cream Cheese Cake Pops
This post may contain affiliate links. As an Amazon Associate I earn from qualifying purchases. Please read my disclosure policy.

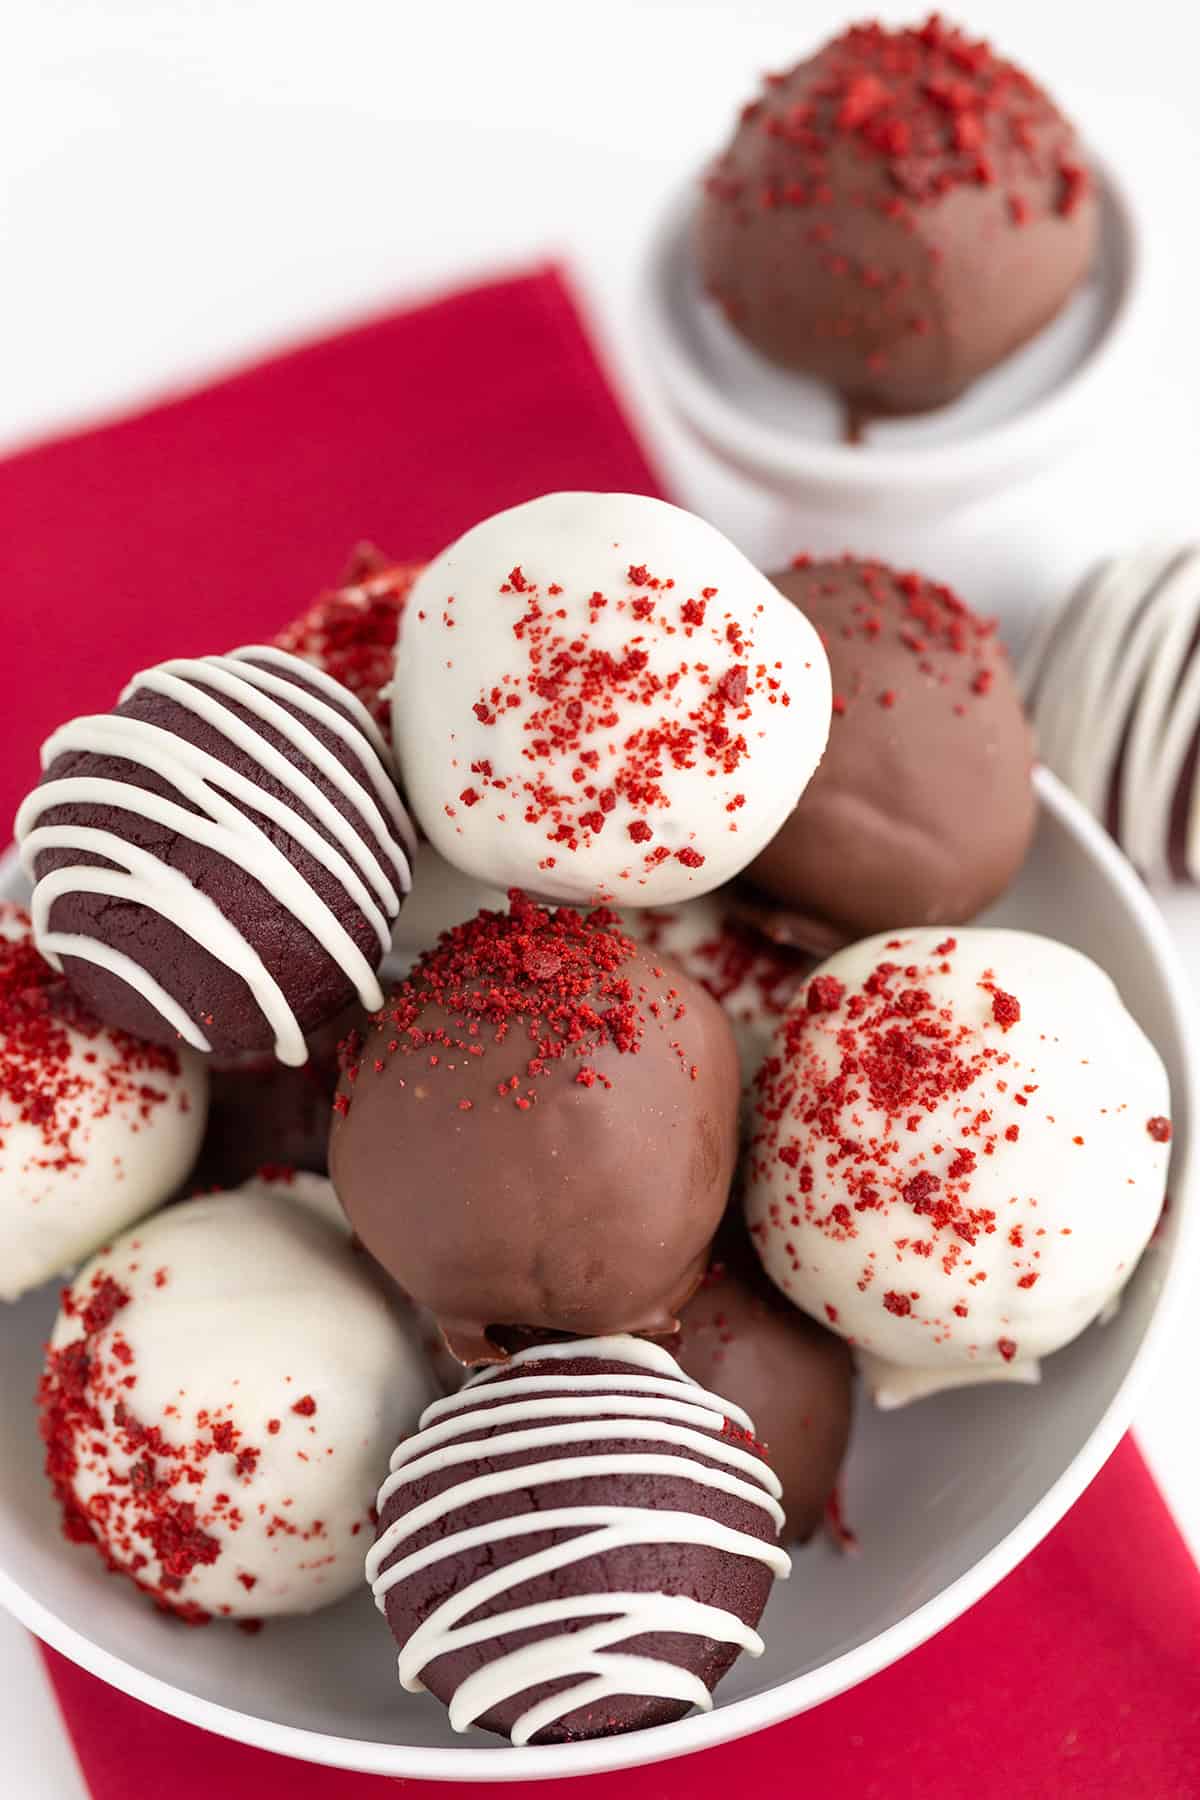
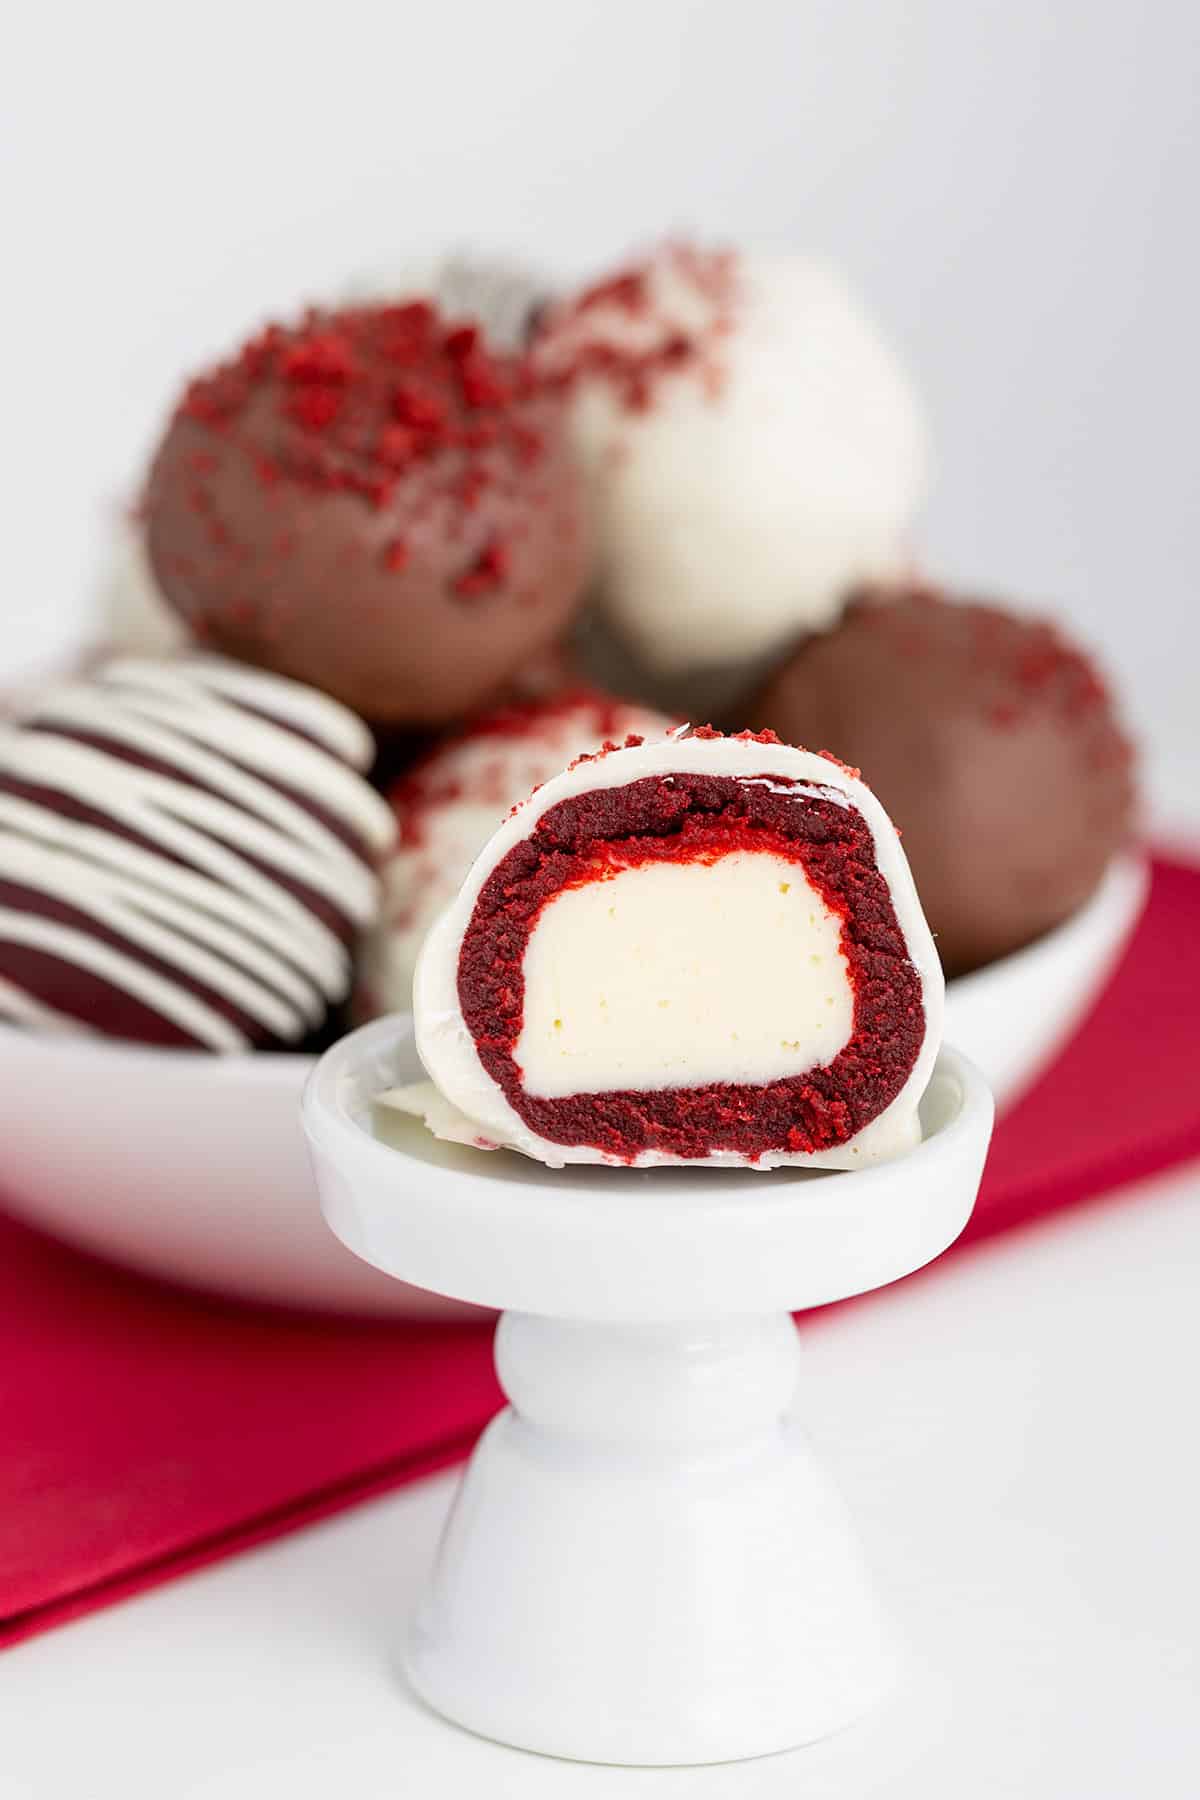
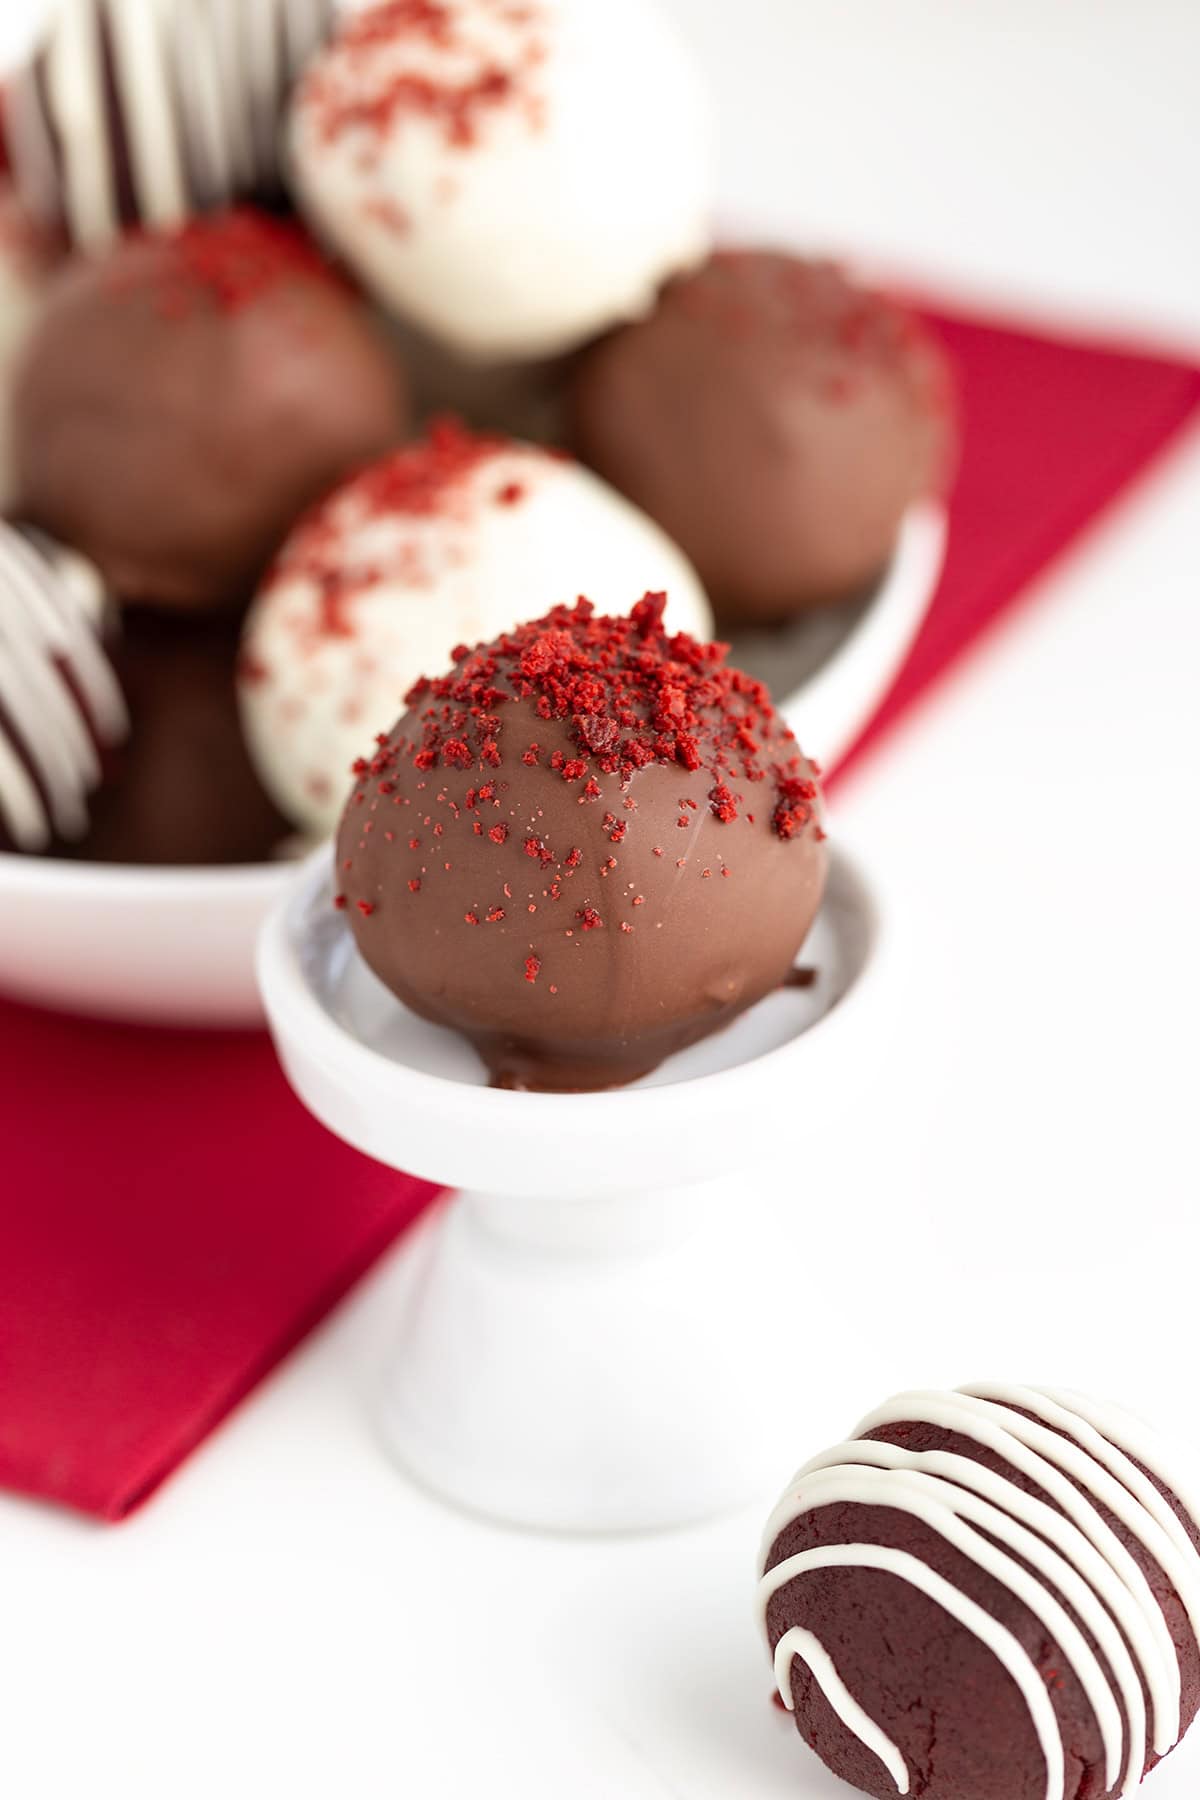
These Red Velvet Cream Cheese Cake Pops have a cream cheese white chocolate center, wrapped in a homemade red velvet cake and dipped in a chocolate for a crunchy shell. These are the perfect Valentine’s Day cake pops or Christmas cake pops! They also make a great little treat for any red velvet cake lover!
Cake pops are a super popular, amazing dessert. They are great for birthday parties or to enjoy as a small, sweet treat any time of day. Cake pops are also just fun to eat.
Our red velvet cake pops with cream cheese filling are especially delicious and a dessert that we know you will love. Read a little bit more about these tasty morsels before diving into our delicious recipe.
Red Velvet and cream cheese always go perfectly together. I made a delicious Red Velvet Fudge, Red Velvet Sugar Cookies, and Red Velvet Cake that all pair the two together.
Ingredients
See the recipe card at the bottom of the post for all ingredients and quantities.
- white baking chocolate – This is for the filling of the cake pops. It helps keep the filling firm.
- cream cheese – The cream cheese provides the flavor and a softness to the filling.
- heavy whipping cream – This thins out the white chocolate and also adds the fat needed so the chocolate doesn’t seize up when the cream cheese is added to it.
- vegetable oil – For the red velvet cake, I used an oil instead of butter. The oil helps keep the cake portion of the cake pop soft when it’s refrigerated.
- buttermilk – This gives the cake a tangy flavor and a tender crumb. Traditionally it was the combination of the buttermilk, vinegar, and cocoa powder that would have a chemical reaction and turn the cake a red tint.
- eggs – large eggs are a must for the cake recipe I made.
- red gel food coloring – Because it’s red velvet cake, it needs a nice red color. I like to use gel food coloring instead of traditional liquid food coloring because it doesn’t add any additional liquid to the recipe.
- white vinegar – The chemical reaction that includes the vinegar helps create the velvet crumb.
- vanilla extract – Use your favorite store-bought or homemade vanilla extract.
- cake flour – Cake flour has less gluten in it than all-purpose flour or bread flour and makes a more tender cake.
- sugar – Granulated or white sugar is used in this recipe.
- cocoa powder – Cocoa powder is used in the red velvet cake but not nearly the amount that’s used in a chocolate cake recipe.
- baking soda – the leavening agent for this homemade cake.
- salt – salt to help balance out the sweetness of the cake.
- melting wafers – Once the red velvet cream cheese truffles are made, they can be coated in a layer of chocolate to keep them moist, add a nice crunch, and a boost of chocolate flavor.
Substitutions and Variations
- The white baking chocolate can be substituted out for white chocolate chips but it’s going to add a lot more sweetness to the cake pops.
- You can use a red velvet cake mix instead of making this delicious homemade cake recipe.
- You can use powdered natural food colored to the cake recipe instead of gel food coloring if you prefer.
- You can use almond bark or chocolate chips instead of the melting wafers. The chocolate chips will take a lot longer to set up though.
- You can bake the red velvet cake in a 9×13 pan instead of two round pans. The bake time will be longer so keep an eye on it.
- You can dip a cake pop stick in the melting wafers and pop into the center of each cake pop. Let it set before dipping the entire cake pop in the chocolate.
NOTE: This recipe has not been tested with other substitutions or variations
How to Make Red Velvet Cake Pops
Red velvet cake pops all begin with the red velvet cake. You need to make a fantastic red velvet cake that will be the basis of the whole dessert. Our red velvet cake recipe is very easy and also very tasty. Here is how we make red velvet cake:
- Mix all of the wet ingredients together in a large mixing bowl.
- In a separate bowl, combine the dry ingredients.
- Slowly add the wet ingredient mix into the dries and whisk well so there are no lumps in the batter.
- Pour the red velvet cake batter into two greased pans and bake at 350 degrees F for about 30 minutes.
Once the cakes have cooled, we break them apart into small pieces and then use a hand mixer to crumble them even more. A small amount of frosting is added to the cake and it is mashed even more. This will be the red velvet part of the cake pop! Blending in frosting not only adds flavor to the cake pops but it also helps the cake hold together well, making it more dense and delicious.
Since we are making red velvet cake pops with cream cheese filling, the next step is to make the cream cheese filling. You can actually do this before baking the red velvet cake if you want to get a few steps ahead!
To make the cream cheese filling, we combine the white chocolate and heavy whipping cream and heat in the microwave. Whisk them together to make a smooth ganache. Add in the cream cheese to a medium bowl and stir in the white chocolate ganache a little at a time until fully combined. Chill the cream cheese filling in the fridge. It will get hard but still be soft enough to scoop.
Scoop the cream cheese filling using a 1 tablespoon cookie scoop and then roll it into balls with your hands. Set these little cream cheese balls aside on a plate or lined baking sheet.
Once you have your red velvet cake mix and your cream cheese balls, it is time to make the red velvet cake pops! Scoop the red velvet cake mix and roll it into a ball using your hands. Flatten the ball and place a cream cheese filling ball in the center. Enclose the cream cheese ball with the red velvet cake and then roll again. You should have a large, red velvet cake ball with a secret cream cheese ball hidden inside it! Repeat this with all your cake and cream cheese filling.
Once rolled, dip each ball into melted white chocolate then place them on a clean parchment lined sheet tray to let them cool and harden. Once all the cake pops are dipped and cooled, they are ready to enjoy! They taste just as good as they look!
TIP: Use a fork to dip the cake pop and remove it from the melted chocolate wafers. Gently tap the excess chocolate off by tapping the wrist of the hand holding the fork. Use a skewer to push the bottom of the cake pop off the fork and twist the skewer as you pull it away from the cake pop to cover your marks with the chocolate.
How to Store Red Velvet Cream Cheese Cake Pops
Once your red velvet cream cheese cake pops are made, you want to store them in the fridge. Since the cake pops are made with cream cheese, they are perishable and need to be refrigerated. The good news is that they will keep in the fridge for about 2 weeks! You can easily make the red velvet cream cheese cake pops in advance and store them until you are ready to enjoy. This makes for easy party prep!
Can you freeze Red Velvet Cream Cheese Cake Pops?
If you are thinking of preparing your cake pops way ahead of time, you may want to consider freezing them. Chocolate doesn’t always freeze well. Actually it doesn’t always thaw very well. Thawing frozen chocolate can make the chocolate wet and soggy, not good!
To successfully freeze your cake pops, roll the cake balls, enclosing the cream cheese frosting in the center of the cake and add the lollipop sticks. Then, place the uncoated cake pops in a large zippered freezer bag, seal and freeze. The red velvet cake pop balls will keep in the freezer for about 2 months.
When you are ready to finish the cake pops. Remove them from the freezer and place them in the fridge to thaw for about one day. You can also remove them from the bag and thaw at room temperature for about 4 hours.
Melt the white chocolate and dip the thawed cake pops. This is the best way to freeze cake pops, ensuring that they are fresh and delicious!

Recipe FAQs
You definitely can use red velvet boxed cake mix to make red velvet cake pops. Bake the red velvet cake as directed on the box, let it cool and then crumble the cake as directed in our recipe.
You can choose to dip your red velvet cake pops in semi sweet baking chocolate instead of white chocolate. Really any kind of chocolate will work! We like white chocolate since it is traditionally paired with red velvet. The bright white color also looks fantastic next to the deep red cake. However, semi-sweet, milk or dark chocolate will all taste great too!
You can dip your red velvet cake pops in almond bark instead of white chocolate. It will taste just as great and do the job just as well.
If you try this recipe, be sure to leave a rating below and also share it on Instagram, and tag me! You can also find me on Facebook and stay up to date on recipe releases by joining the Newsletter!
Red Velvet Cream Cheese Cake Pops
SAVE THIS RECIPE
Ingredients
Cream Cheese Filling
- 8 ounces white baking chocolate, chopped
- 3 tablespoons heavy whipping cream
- 8 ounces cream cheese, room temperature
Cake
- 3/4 cup vegetable oil
- 1 cup buttermilk
- 2 large eggs
- 3/4 tablespoon red gel food coloring
- 1 teaspoon white vinegar
- 1 teaspoon vanilla extract
- 1 3/4 cups cake flour
- 1 1/2 cups granulated sugar
- 1/4 cup unsweetened cocoa powder
- 1 teaspoon baking soda
- 1 teaspoon salt
- 3 to 6 tablespoons vanilla frosting, canned or homemade
- 10 ounce bag Ghirardelli melting wafers, white or chocolate
Instructions
Cream Cheese Filling
- Place the 8 ounces white baking chocolate and 3 tablespoons heavy whipping cream in a microwave-safe bowl. Microwave for 30 seconds and stir. Repeat microwaving and stirring until the white chocolate is completely melted.
- Add the 8 ounces cream cheese to a medium bowl. Add the white chocolate mixture slowly and stir until combined.
- Place in the fridge overnight to set up.
- The following day, scoop the cream cheese white chocolate mixture with a 1 tablespoon cookie scoop and place on a parchment lined baking sheet.
- Place the scooped mixture into the freezer and let freeze for 3 hours or more. Once you remove the mixture from the freezer, you’ll need to work quickly so it doesn’t thaw and become soft.
Cake
- Preheat the oven to 350 degrees F. Spray two 8-inch round cake pans with nonstick baking spray. Cut two 8-inch parchment paper circles to sit in the bottom of the cake pans. Add about 1 – 2 tablespoons of flour to coat the sides of the greased pan and tap out any excess flour. Repeat with the second cake pan.
- Add the 3/4 cup vegetable oil, 1 cup buttermilk, 2 large eggs, 3/4 tablespoon red gel food coloring, 1 teaspoon white vinegar, and 1 teaspoon vanilla extract to a medium mixing bowl. Beat with a hand mixer on medium until combined.
- In a large bowl, add in the 1 3/4 cups cake flour, 1 1/2 cups granulated sugar 1/4 cup unsweetened cocoa powder, 1 teaspoon baking soda,1 teaspoon baking soda, and 1 teaspoon salt. Whisk to combine.
- Add the wet ingredients in with the dry and beat until just combined. Scrape down the sides of the bowl and beat in any remaining flour.
- Divide the batter evenly between the two prepared cake pans.
- Place in the preheated oven and bake for 30 to 35 minutes or until a toothpick inserted in the center of the cake comes out clean or with moist crumbs.
- Remove from the oven and let cool in the pan for 30 minutes before turning out onto a cooling rack to cool completely.
- Once cooled, crumble the cakes into a large mixing bowl. Begin mixing on low with a hand mixer.
- Add in 3 to 6 tablespoons vanilla frosting and continue to mix with the hand mixer. The cake should be able to hold together when it’s rolled together and then flattened out. If it doesn’t, add more frosting 1 tablespoon at a time until it does.
- Scoop the cake pop mixture out with a 1 1/2 tablespoon table scoop. Cover with plastic wrap to keep them from drying out as you work on them one by one.
- Remove the cream cheese mixture from the freezer.
- Roll the scooped cake pop between your hands and then flatten. Make sure it’s large enough to wrap the cream cheese mixture. Place a frozen cream cheese mixture scoop in the center of the flattened cake pop and wrap the cake pop up around the mixture. Seal the edges by gently pushing but working quickly.
- Place the cake pop on a piece of parchment paper and continue working on the rest of the cake pops.
- Place the 10 ounce bag Ghirardelli melting wafers in a microwave-safe bowl and microwave in 30 second intervals and stir after each time until the wafers are completely melted.
- Dip the cake pops in the melted chocolate and tap off any excess chocolate. Place back on the parchment paper to harden.
- Place in an airtight container and store in the refrigerator.
Notes
Nutrition
(Nutrition facts are an estimate and not guaranteed to be accurate. Please see a registered dietitian for special diet advice.)