Homemade Caramels
This post may contain affiliate links. As an Amazon Associate I earn from qualifying purchases. Please read my disclosure policy.

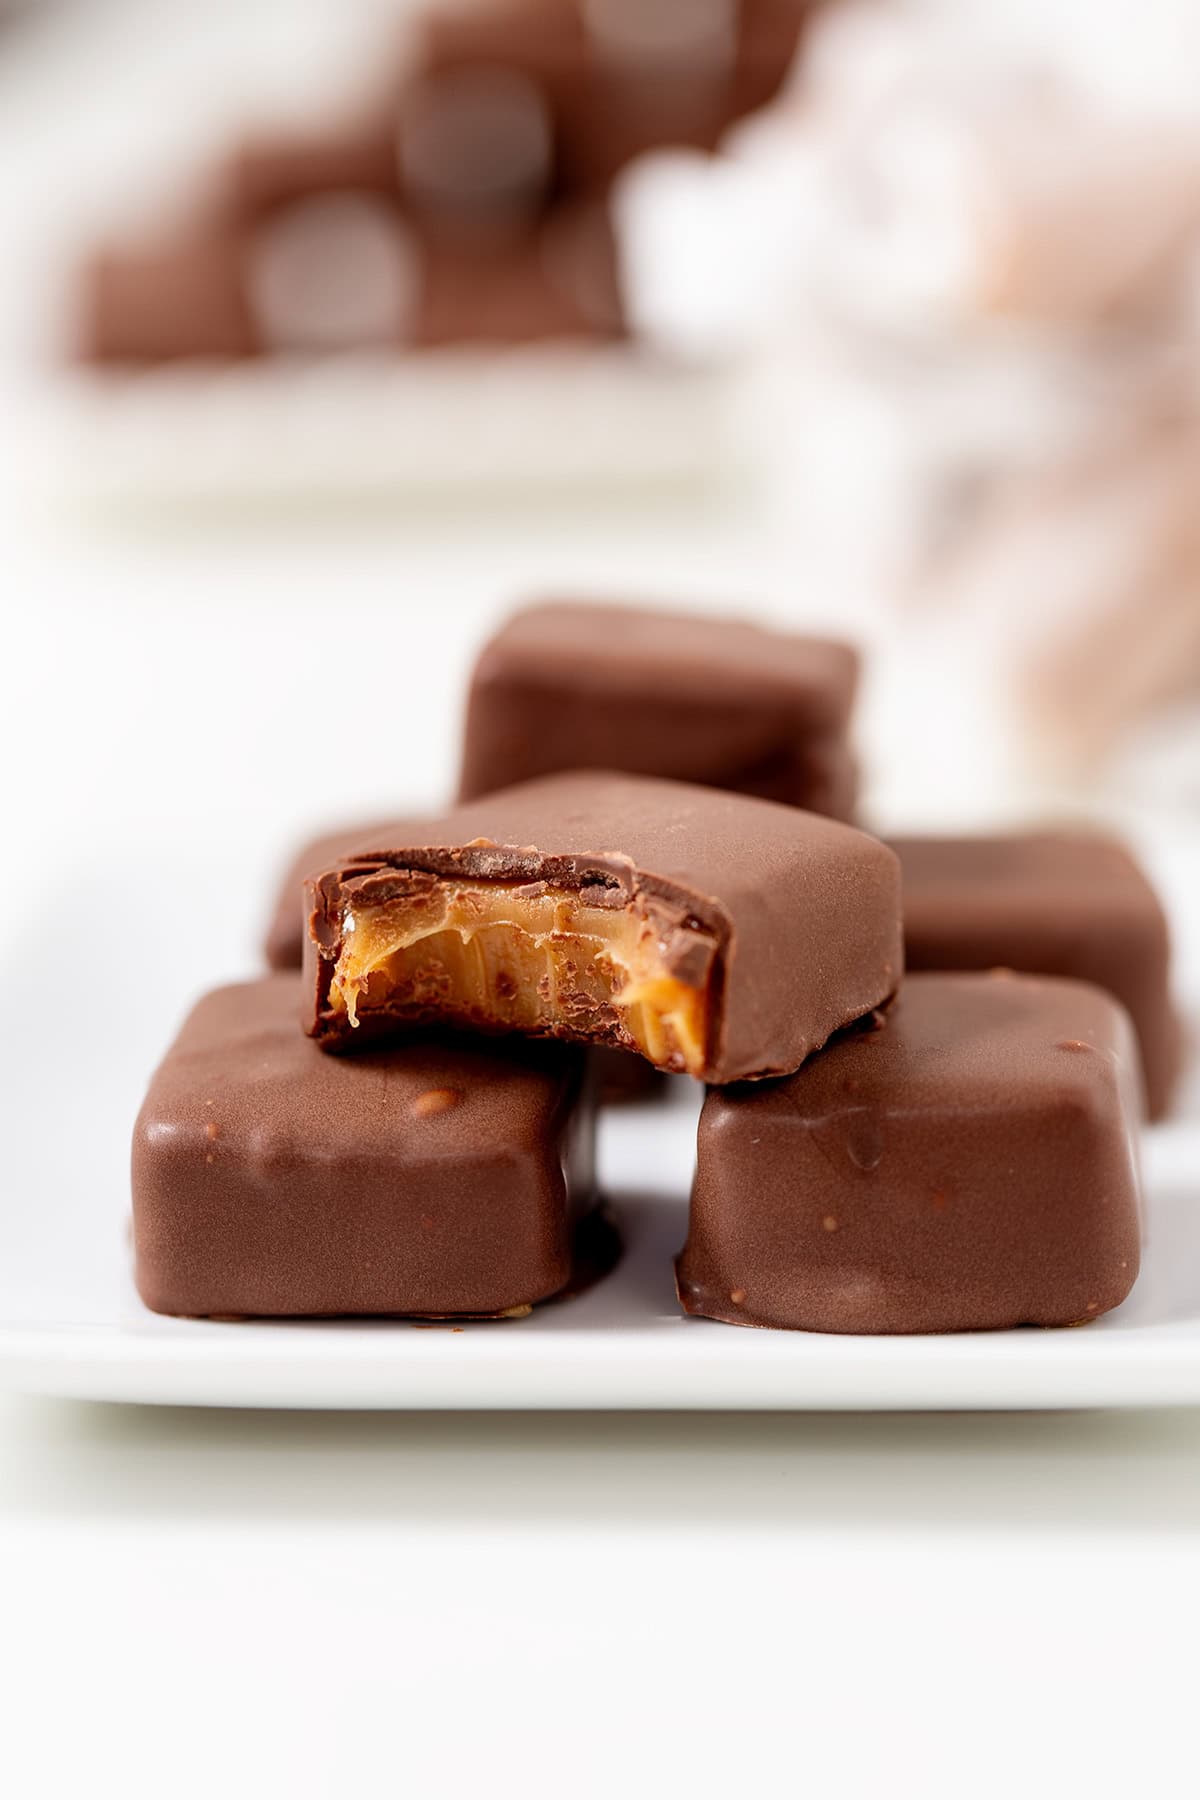
These soft and chewy homemade caramels are buttery, sweet, and have the perfect chew without sticking in your teeth. These make the perfect candies to wrap up, to pour into small candy molds and dip into chocolate, or to make a caramel lollipop out of. They’re the perfert homemade candy for holidays, cookie trays, or just to enjoy.
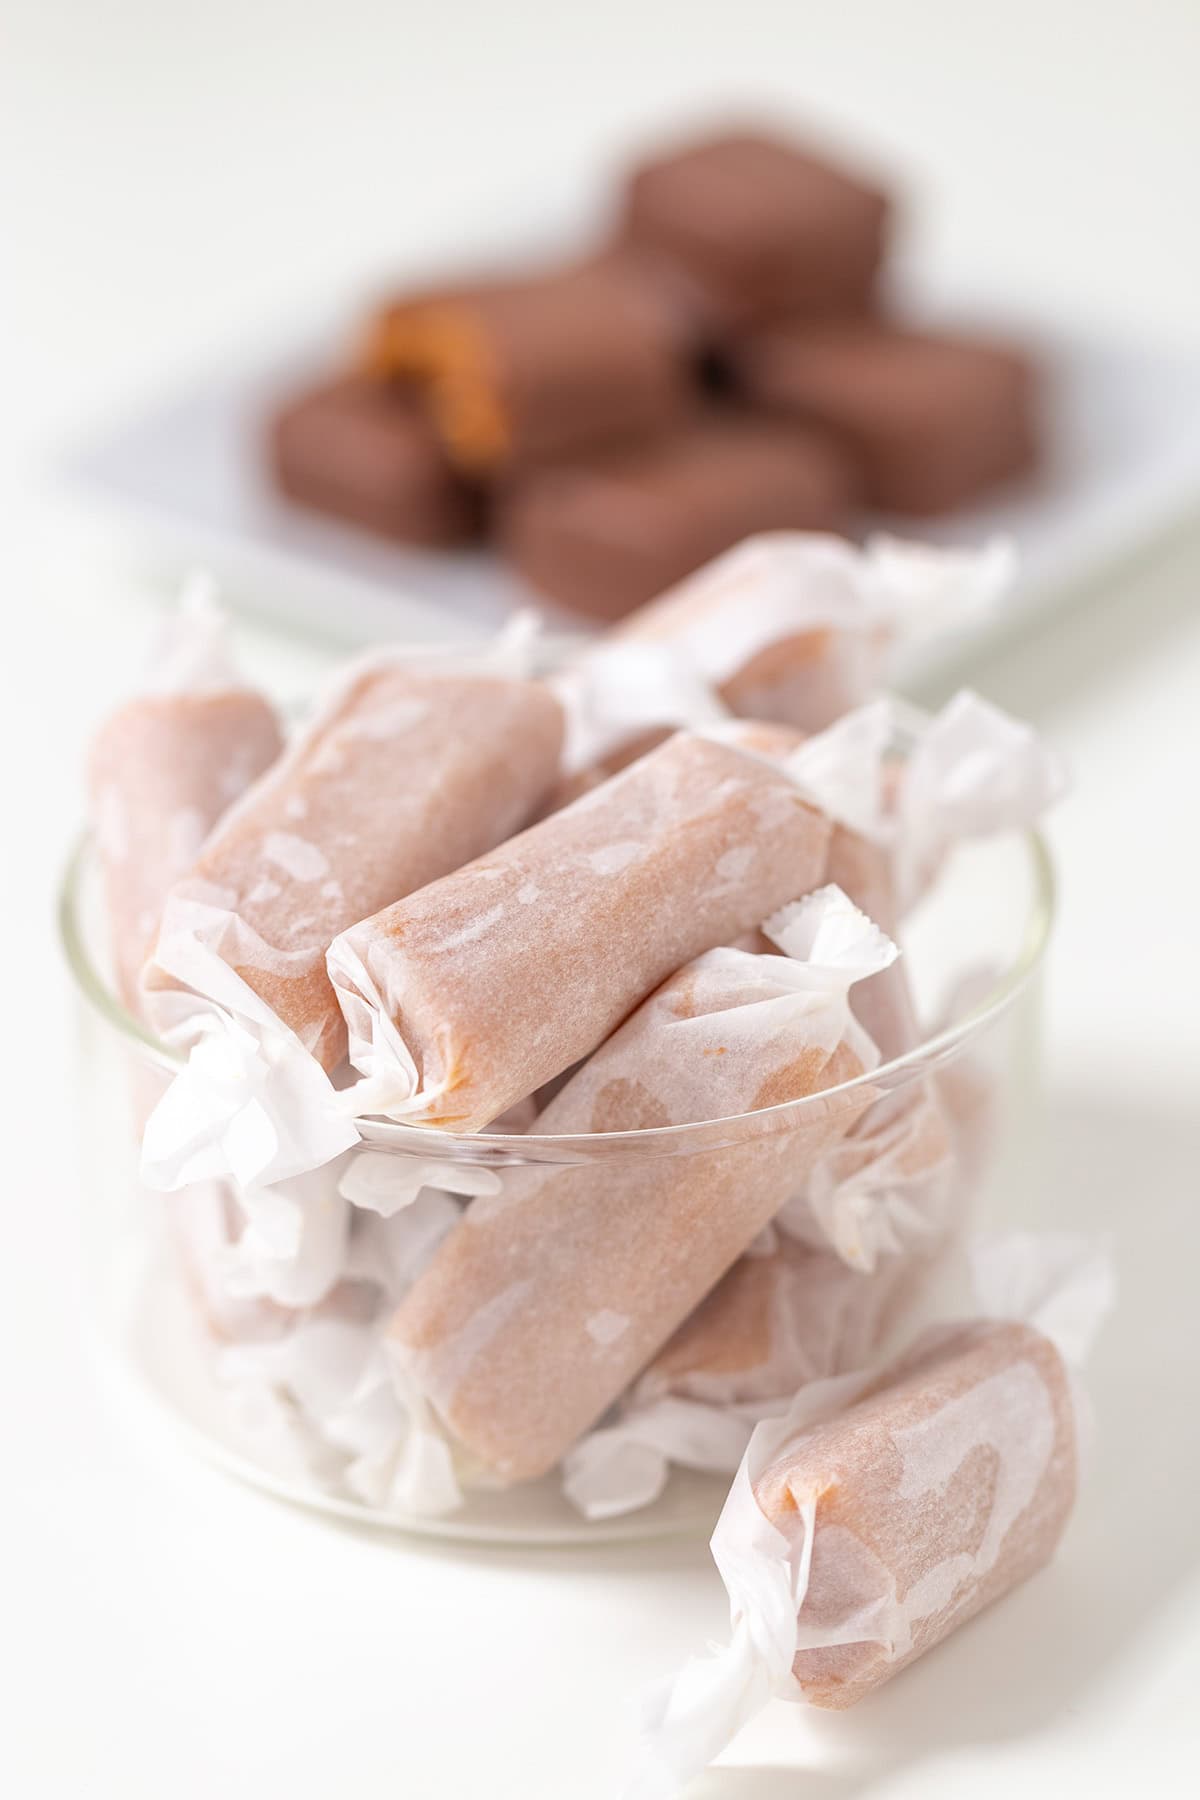
These chewy caramels hold their shape perfectly and would be amazing gifts wrapped in foil candy wrappers or precut pieces of parchment paper.
Other fun candies to try are these Crockpot Candy, Rock Candy, and Divinity Candy.
Reasons You’ll Love This Caramel Recipe
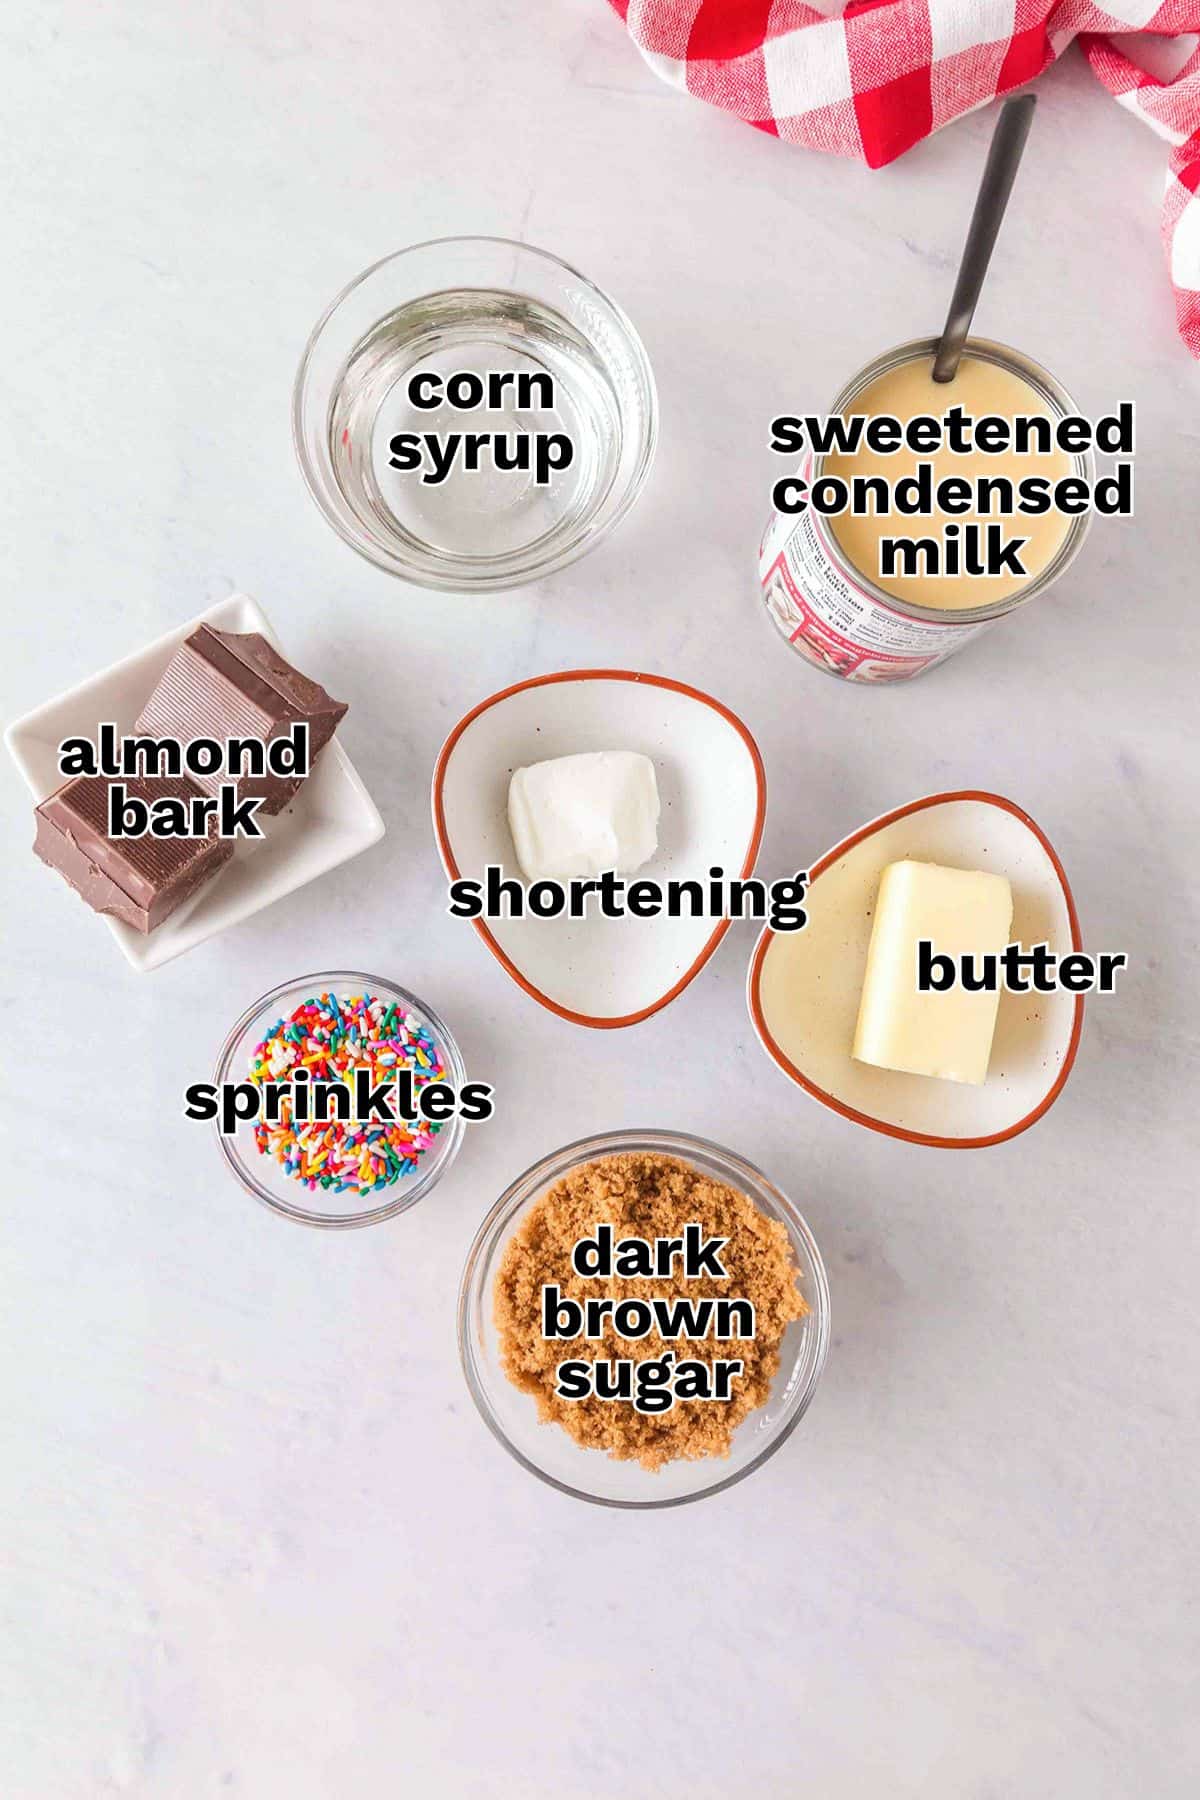
Minimal Ingredients – The caramel requires only 4 ingredients. If you want to include the chocolate coating and garnish, it’s a total of 7 ingredients and all of them are easily found in any grocery store.
Homemade Gift – These are the perfect homemade candies to share with friends or family.
Versatile – This recipe can be made into caramels to cut and eat, added as a layer in bars such as my chocolate caramel shortbread bars, or used to coat apples, apple slices, pretzel rods, or in homemade turtle candies.
Ingredients
See the recipe card at the bottom of the post for all ingredients and quantities.
- Salted Butter – I use salted butter because it already has the salt added and that’s what I always have on hand. Unsalted butter will work, but be sure to add ¼ teaspoon of salt to the recipe.
- Dark Brown Sugar – Use dark brown sugar for this recipe. There’s more molasses in dark brown sugar for flavor and color.
- Light Corn Syrup – I used light corn syrup because it’s easy to find at the grocery store and I always have some on hand. Dark corn syrup works great as well and will add a richer molasses flavor and deeper color to the caramel.
- Sweetened Condensed Milk – Use the full fat sweetened condensed milk for this recipe.
- Almond Bark – Almond Bark, Coating Chocolate, or chocolate chips will work to coat the caramels. I like almond bark because it melts perfectly and always has a shiny shell unless the almond bark is old.
- Shortening – Shortening helps thin out the chocolate. If the chocolate is a solid, add the shortening as a solid. If the chocolate is melted and you want to add the shortening, melt the shortening first and stir well. You can use the butter flavored or the plain unflavored shortening.
Substitutions and Variations
- Light Corn Syrup – You can use dark corn syrup instead if that’s what you have on hand.
- Almond Bark – You can substitute the almond bark for coating chocolate or melted chocolate chips. The chocolate chips will take much longer to set up though.
- Shortening – Instead of using shortening, you can use coconut oil if you don’t mind the coconut flavor or refined coconut oil to avoid the coconut flavor.
NOTE: This recipe has not been tested with other substitutions or variations
How To Make Soft and Chewy Caramels
Prep: Line an 8×8 square pan in parchment paper with the sides fastened to the pan with binder clips. You can use a silicone candy mold as well. Grease the candy mold or parchment lined baking sheet with nonstick cooking spray.
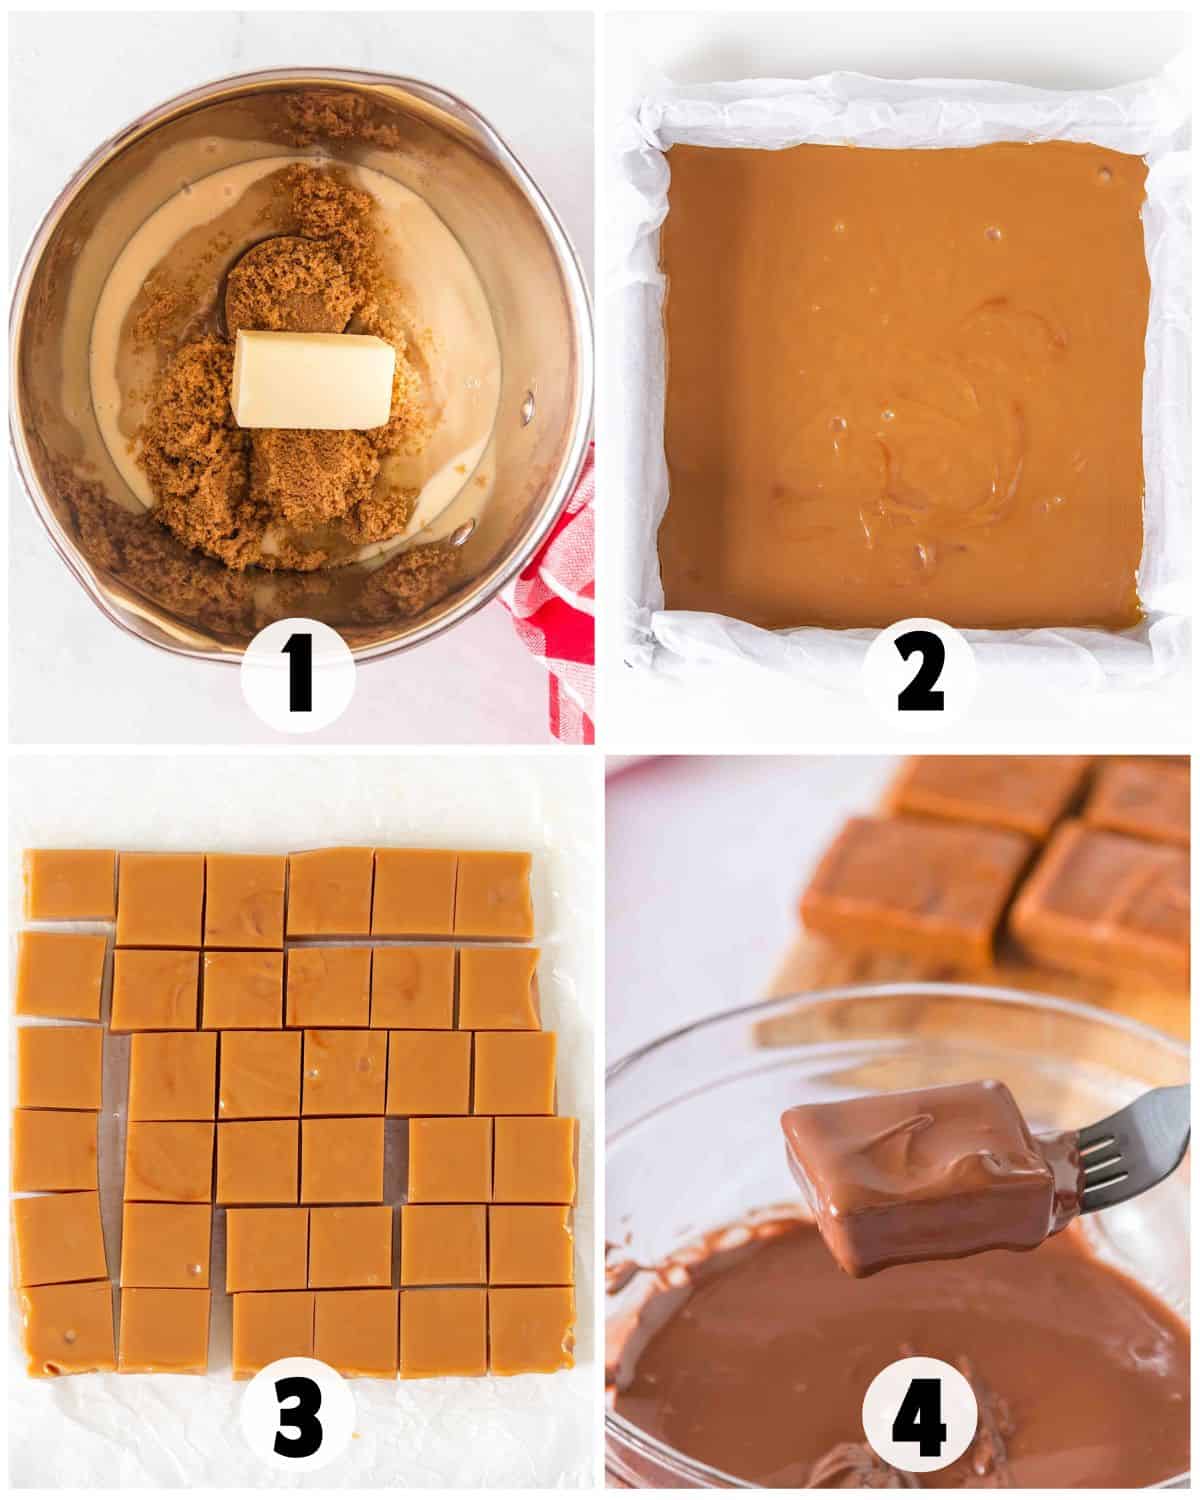
Step 1: Using a medium sized saucepan, add the butter, dark brown sugar, corn syrup, and sweetened condensed milk. Place over medium-low heat and stir constantly while it cooks. Once it starts bubbling, place a candy thermometer into the caramel mixture. Let it come up to 245 degrees exactly. Stir constantly to avoid the mixture burning.
Step 2: Once the caramel mixture reaches 245 degrees F, remove it from the heat and immediately pour it into the prepared pan/mold. Tab the pan/mold to remove any air bubbles and smooths out the caramel.
Step 3: Let cool completely before removing it from the pan/mold and slicing the caramels.
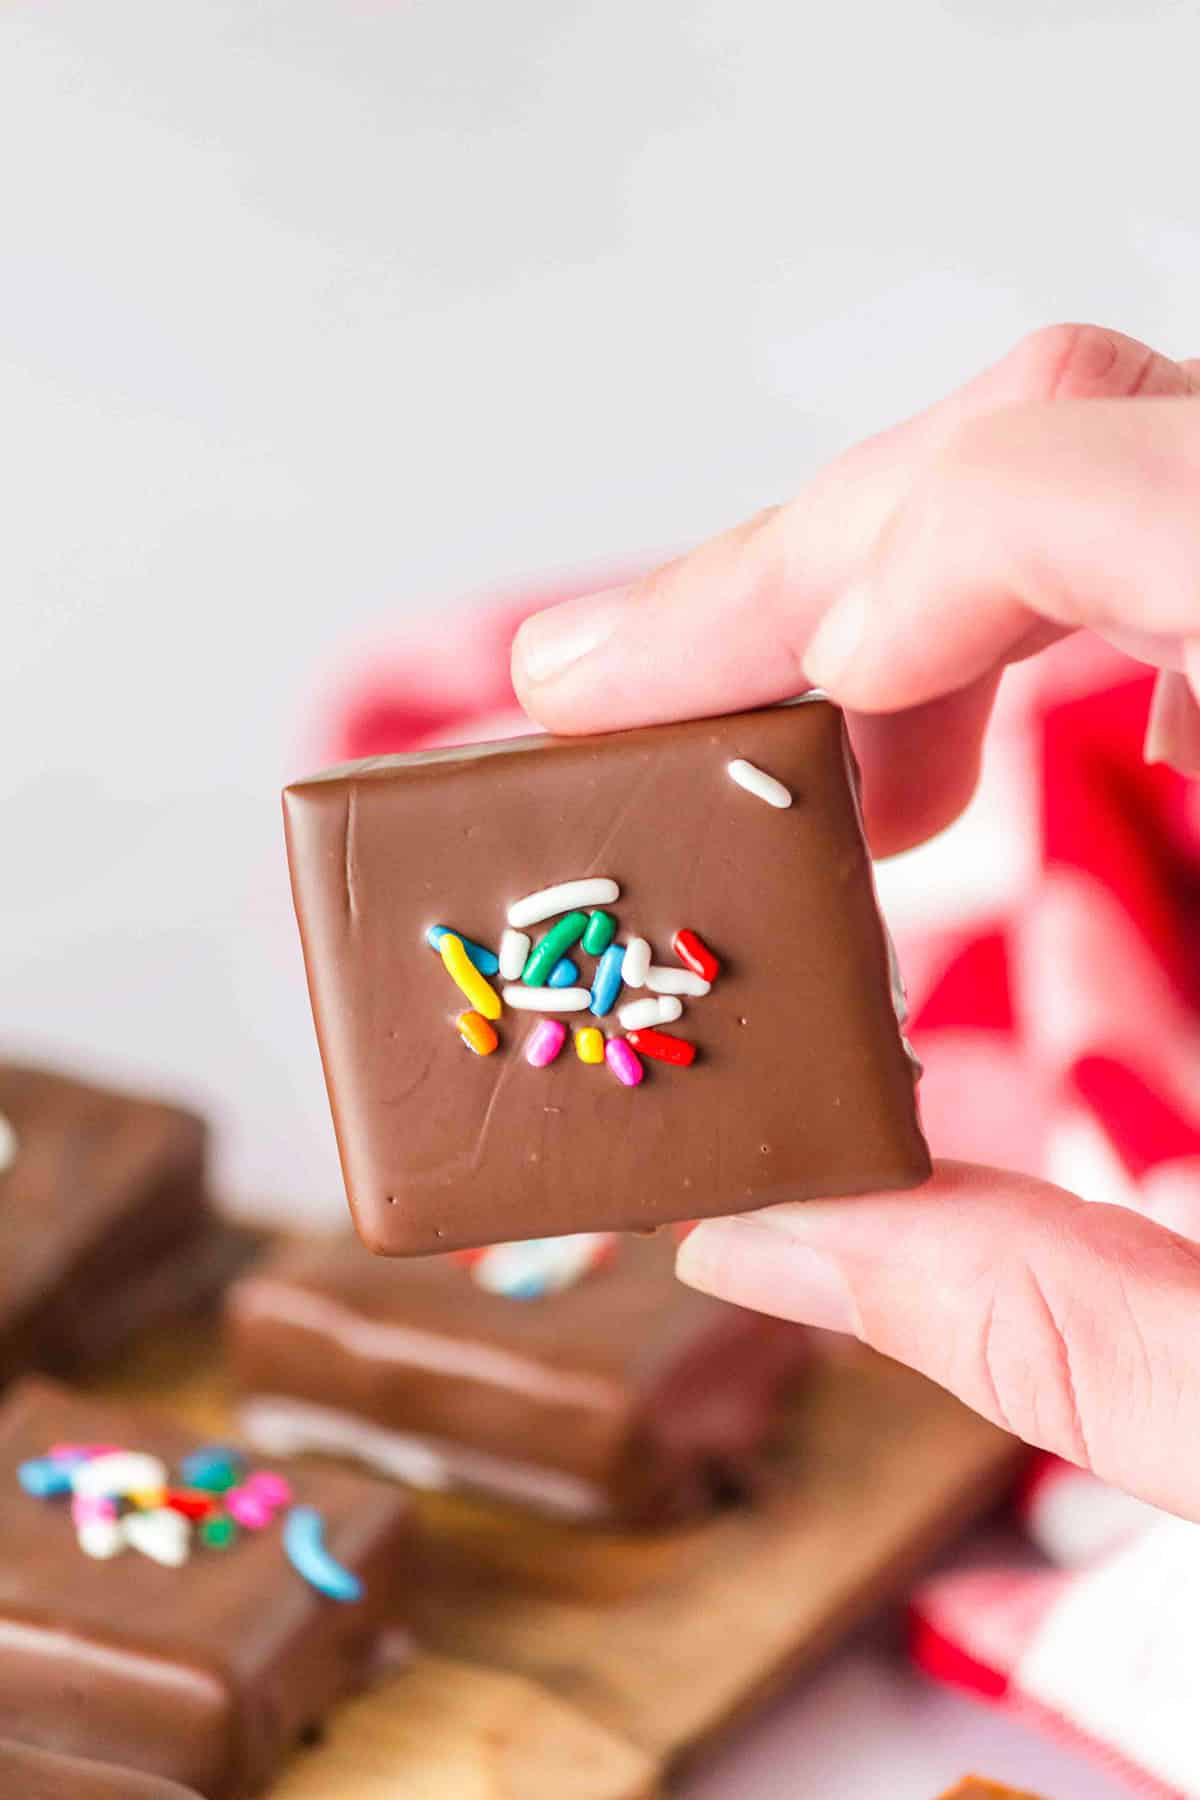
Step 4: If you’re dipping the caramels in chocolate, do it now. Melt the almond bark and shortening together in a microwave-safe bowl in 30-second intervals until the chocolate is melted and smooth. Using a fork, dip the caramel into the melted chocolate and tap off any excess chocolate. Place on a piece of parchment paper until the chocolate is set up.
Tips for the Best Results
- Keep the heat at a medium-low temperature. If you have the heat too high, it will burn the caramel no matter how fast you stir your caramel.
- Do not heat your chewy caramel to a temperature over 245 degrees. It will become too firm and will difficult to slice and chew.
- A candy thermometer is a must for this recipe.
- Don’t stop stirring the caramel. It’s a very thick consistency and can stick and brown up very, very quickly.
How to Store and Freeze
Store these caramels either in an airtight container slightly spaced apart so they don’t stick together or wrapped in parchment paper. They can be stored at room temperature as long as it’s cool or in the refrigerator for up to a month.
Wrap the caramels in small parchment paper squares to freeze. Place them in a freezer bag or freezer-safe container in the freezer for up to 3 months. Thaw in the refrigerator overnight.
Recipe FAQs
The caramel wasn’t cooked quite long enough to hit the firm ball stage. Whether it’s because you didn’t use a candy thermometer or your candy thermometer temperature is off, the firm ball stage wasn’t met. You can try to reheat the caramel up to 245 degrees F to try to save it, but I haven’t tried it myself to know if it will work for sure.
Unfortunately, I don’t think you can fix it. You cooked the caramel mixture higher than 245 degrees F.
Yes, that can happen and is quite normal for the caramel to slow down in climbing in temperature once it gets close to 245 degrees F. Don’t touch the temperature of the heat and remember to be patient and continue to stir.
This candy mold makes bite size square caramels. This candy mold has larger squares that I own and use. There are also round ones, dome ones, and variety packs with all sorts of designs.
This post was originally posted February 12th, 2014, but has since been updated with new tips, tricks, and photos.
If you try this recipe, be sure to leave a rating below and also share it on Instagram, and tag me! You can also find me on Facebook and stay up to date on recipe releases by joining the Newsletter!
Chewy Homemade Caramels
SAVE THIS RECIPE
Ingredients
- 1/4 cup salted butter, cubed
- 3/4 cup dark brown sugar, packed
- 1/2 cup light corn syrup
- 14 ounces sweetened condensed milk
Chocolate
- 2 squares chocolate almond bark
- 2 teaspoons shortening
- Sprinkles to garnish
Instructions
- Line an 8×8-inch pan with parchment paper or aluminum foil. If using parchment paper, use binder clips to keep the parchment paper against the sides of the pan. Grease the parchment paper/foil with nonstick cooking spray. If you're using a pan, grease it with nonstick cooking spray.
- In a medium saucepan, add in the butter, brown sugar, corn syrup, and sweetened condensed milk. Place it over medium-low heat and stir constantly with a spatula.
- Once the mixture comes up to a boil, place a candy thermometer on the side of the pan. Continue stirring constantly so the mixture doesn't burn.
- Once the caramel comes up to 245 degrees F, turn off the heat and spoon the caramel into the pan. Let the caramel cool.
- In a microwave-safe bowl, place the chocolate and shortening. Microwave for 30-second intervals, stirring after each interval until the chocolate is melted. It took 1 minute to completely melt the chocolate.
- Once the caramels are completely cooled, slice the caramels into 35 squares for large caramels or 70 small caramels.
- Dip the cooled caramels into the chocolate and tap off the extra chocolate. Place on a piece of parchment paper to let the chocolate solidify and add some decorative sprinkles while the chocolate is still wet.
- They can stick together if they're not covered in chocolate, so be careful not to layer them without parchment paper or wax paper between the layers.
Notes
Nutrition
(Nutrition facts are an estimate and not guaranteed to be accurate. Please see a registered dietitian for special diet advice.)
These look AMAZING! I’ll have to make some for Easter! YUM!
Thank you! Let me know how they turn out! 😀
I don’t eat carmel anymore however it was one of my favorites. These do look yummy! Thanks, Wendy
Thank you!
I’ve always been afraid to make homemade caramel but after seeing this post on the SITS FB page, I’ve decided to conquer that fear! This weekend, I’m making these. Thanks. 🙂 (Great photos, too!)
Thank you! You can do itttt!
OMG – are those ever beautiful! Pinning to Pinterest right now! Stopping by from SITS! Guess I’m going to raid the pantry and have something sweet for breakfast after seeing this post!
Thank you! Pinning is good! 😀