Mocha Layer Cake with Coffee Frosting
This post may contain affiliate links. As an Amazon Associate I earn from qualifying purchases. Please read my disclosure policy.
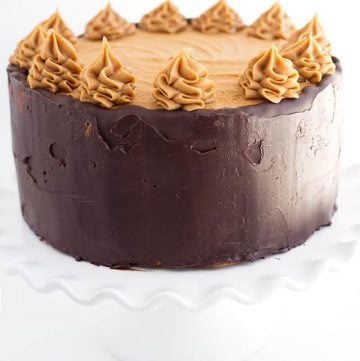
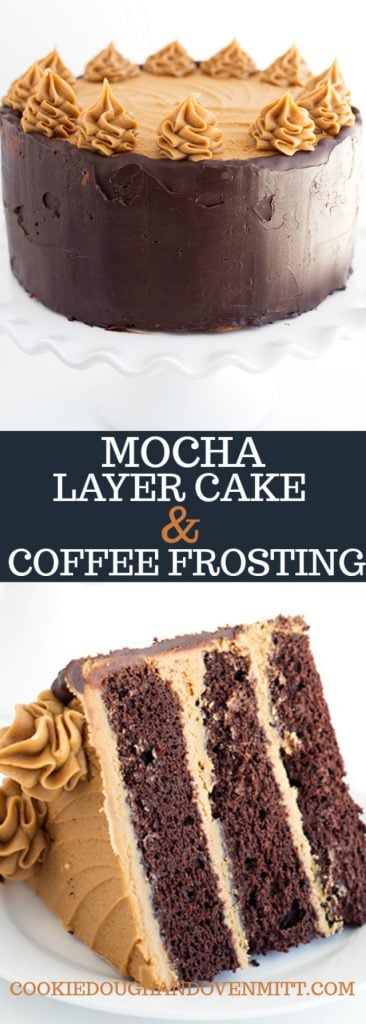
This dense chocolate mocha layer cake with coffee frosting will excite any coffee lover or chocolate cake fanatic. It’s the best of both worlds! The dense chocolate cake has strong coffee baked into it, a drizzle of coffee simple syrup to moisten it up, a healthy dose of coffee frosting and last but definitely not least chocolate ganache for the finish.

Normally I do a ganache drip on my cakes. It’s sort of my thing, but I did such a terrible job with the coffee frosting last night that it just wasn’t pretty enough or smooth enough to even be peeking through the ganache drizzles. I’m not really sure what happened.
If I had to guess I would say it was that I had worked all day testing recipes and I was ready to be done. I still had to cook dinner and sit down to finish up some work on the computer. That sort of sounds like a lame excuse, right? It’s the truth though.


One of my favorite things about this cake is that it doesn’t need to be mixed with a stand mixer or a hand mixer. It can easily be whisked together. I don’t know why I feel that using a hand mixer is a lot of work or dirties more dishes. I guess maybe it’s more about the hassle of dragging the mixer out and putting it away, not that I already do it 15 times a week anyway. Woohoo for one less time though!

Here’s a fun fact. I almost threw this cake in the garbage the night I was frosting it with just the coffee frosting. I told my husband, “This is horrible. I’m so unhappy with it. I’m just going to throw it out and start over tomorrow.” Wesley, being the calm and collected person he is, says to me, “Why would you do that? Babe, it looks fine.”
We’re opposites.

More coffee recipes
How to make a mocha layer cake with coffee frosting
Mocha Layer Cake with Coffee Frosting
SAVE THIS RECIPE
Ingredients
Cake
- 3/4 cup butter
- 1 cup strong coffee
- 2 tablespoons vegetable oil
- 3/4 cup unsweetened cocoa powder
- 1 cup full-fat sour cream
- 2 teaspoons vanilla extract
- 2 cups cake flour
- 1 1/2 cups granulated sugar
- 1 1/2 teaspoons baking soda
- 1/2 teaspoons baking powder
- 1/2 teaspoons salt
- 1 teaspoons espresso powder
- 2 large eggs, lightly beaten
Coffee Frosting
- 2 cup butter, room temperature
- 6 tablespoons instant coffee granules
- 6 teaspoons water
- 6 cups powdered sugar
- 5 tablespoons whole milk
Ganache
- 1 cup semi-sweet chocolate chips
- 1/2 cup heavy cream
- pinch of salt
- coffee syrup, for brushing the cakes
Instructions
Cake
- Preheat oven to 350 degrees F. Spray 3 8-inch round cake pans with nonstick cooking spray. Place a circle of parchment paper in the bottom of each pan.
- In a medium microwave-safe bowl, add in the 3/4 cup butter and the 1 cup strong coffee. Microwave for 2 minutes or until the butter is completely melted.
- Add in the 2 tablespoons vegetable oil and 3/4 cup unsweetened cocoa powder and whisk until smooth.
- Add in 1 cup full-fat sour cream and 2 teaspoons vanilla extract. Continue to whisk until the sour cream in incorporated.
- In a separate large bowl, add in 2 cups cake flour, 1 1/2 cups granulated sugar, 1 1/2 teaspoons baking soda, 1/2 teaspoons baking powder, 1/2 teaspoons salt, and 1 teaspoons espresso powder. Whisk until combined.
- Pour the cocoa mixture in with the dry ingredients.
- Add in the lightly beaten 2 large eggs. Whisk until most of the lumps are gone and the dry ingredients are incorporated.
- Divide the batter into the 3 prepared cake pans. You can wrap the pans with Wilton’s even baking strips to help make them level.
- Bake for 24 – 26 minutes or until they’re done. Place a toothpick in the center of the cake and if it comes out clean or with moist crumbs it’s done. If there’s batter on the toothpick, let the cakes bake a few minutes longer and test them again.
- Let the cake cool in the pan for about 15 minutes and then turn out onto a cooling rack to finish cooling.
Frosting
- In a large mixing bowl, add in the 2 cup butter. Mix with the hand mixer until the butter is creamy.
- In a small bowl, add the 6 tablespoons instant coffee granules and 6 teaspoons water. Mix until all the granules are dissolved.
- Add the coffee mixture and 6 cups powdered sugar in with the butter. Mix until it comes together.
- Add in the 5 tablespoons whole milk and continue to mix for about 2 minutes. It will make the buttercream light and fluffy.
Ganache
- In a microwave-safe bowl, add in the 1 cup semi-sweet chocolate chips, 1/2 cup heavy cream, and pinch of salt. Stir to combine.
- Microwave for 30 seconds. Stir. Repeat microwaving for 30 seconds and stirring until everything comes together and is smooth.
- Place in the fridge for about an 30 minutes to an hour to cool down and thicken to a spreadable consistency.
Assemble
- Trim the tops of the cakes if they have a dome so they are flat and level.
- Drizzle 2 – 3 tablespoons of the coffee syrup on the first cake.
- Add a generous layer of coffee frosting to the cake. Make sure to level the frosting out so there’s a flat surface for the next layer.
- Add the second cake. Repeat the drizzle of coffee syrup and coffee frosting.
- Add the top layer of cake.
- Drizzle the coffee syrup on top of the cake.
- Add a thin layer of frosting all over the cake to fill in any grooves and catch all of the crumbs. This is the crumb coat. Let it sit and form a crust. This will take maybe 10 – 15 minutes.
- Add a couple large scoops of frosting to the top of the cake. Using an offset spatula, flatten it and let the excess frosting start working its way down the sides of the cake.
- Once the top of the cake is flat, work the frosting down the sides of the cake. Grab more frosting as needed. You can use a bench scraper or a large offset spatula to smooth the sides of the cake.
- For a drizzle of ganache, add it into a sandwich bag or disposable piping bag. Cut a small hole and drizzle it down the sides of the cake. For a shell of ganache on the sides of the cake, place the warm ganache in the fridge for about 30 minutes or until it becomes a spreadable consistency. Spread it on the sides of the cake.
- Place the remaining coffee frosting into a piping bag fitted with a 1M tip. Pipe swirls on the top of the cake.
- Cut and serve. Store in a cool place or fridge.
Nutrition
(Nutrition facts are an estimate and not guaranteed to be accurate. Please see a registered dietitian for special diet advice.)
I am making your cake and hope I am understanding the recipe that I only put 1/4 cup of coffee in it and save rest to drizzle on cake. You called it coffee syrup so I hope the is referring to the strong cup of coffee. It might be helpful to say how much coffee is added with the butter and to save the rest for drizzle. Thank you! Hoping my daughters birthday cake turns out great!
Hi there! The coffee syrup and strong coffee aren’t the same. 1 cup of strong coffee should go into the cake recipe and the coffee syrup should be brushed on the baked cake.
Please excuse me but I have read through the whole recipe I could not find the recipe for the coffee simple syrup.
Here it is! https://www.cookiedoughandovenmitt.com/coffee-syrup/
I agree with your husband, it looks amazing! Thanks for linking up to #HomeMattersParty
Your husband was right, this cake looks pretty darn good!