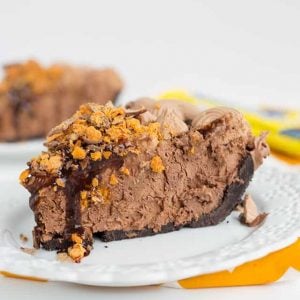
Butterfinger Ice Cream Pie
This post may contain affiliate links. As an Amazon Associate I earn from qualifying purchases. Please read my disclosure policy.
This Butterfinger Ice Cream Pie has an easy homemade chocolate ice cream that does not require an ice cream maker. There are bits of Butterfinger Bars chopped up in it, swirls of peanut butter and chocolate syrup, and topped with a chocolate whipped cream! It’s the perfect summer treat and is so simple to put together!
This post was sponsored but has since been updated.

SAVE THIS RECIPE
Butterfinger Ice Cream Pie
It’s hard to believe that this Butterfinger Ice Cream Pie can be made in 5 easy steps, isn’t it?
Butterfinger bars are one of my very favorite candy bars. Their taste has the perfect crispy, crunchy, peanut-buttery flavor. They even smell amazing! They also make the perfect addition to any dessert recipe especially these Easy No Bake Butterfinger Bites, Butterfinger Trifles, and this Butterfinger Ice Cream (that’s also no churn!)
FREE EMAIL BONUS: Treat yourself with these delicious recipes
I’ve noticed a lot of ice cream cakes and pies use store-bought ice cream, so I thought why not switch it up?! Let’s get a little adventurous with our ice cream pie making today and make our own ice cream. I need it to be quick AND easy for everyone to make without having special tools, meaning an ice cream maker. I whipped up a no-churn chocolate ice cream to stuff inside that chocolate cookie pie crust.
Ingredients
See the recipe card at the bottom of the post for all ingredients and quantities.
- Oreo cookies – You’ll need about 25 cookies. Any flavor Oreo cookie will work, just make sure they aren’t double stuffed!
- butter – I like to use salted butter to add a little salt to the crust, but you can use unsalted and add 1/4 teaspoon of salt if you would like. The butter is going to be the binding agent.
- heavy whipping cream – This is going to be whipped to stiff peaks for both the no churn chocolate ice cream and the whipped topping!
- sweetened condensed milk – Don’t get this confused with the evaporated milk. This is going to sweeten our no churn ice cream.
- unsweetened cocoa powder – This combined with the chocolate chips give the ice cream pie the rich chocolate flavor.
- milk chocolate chips – I love milk chocolate chips, but you can use semi-sweet if that’s what you prefer or have on hand. They’re going to be melted.
- Butterfinger bars – You have to have butterfinger bars to make a butterfinger ice cream pie right? They’re going to be chopped up.
- peanut butter – Don’t use natural peanut butter for this recipe. My favorite is Jif.
- chocolate syrup – You can use homemade chocolate syrup or store-bought. It just adds another chocolate component to the pie.
Substitutions and Variations
- The heavy whipping cream is whipped into 6 cups of whipped cream. You can substitute that out for three 8 ounce containers of Cool Whip.
- Any flavor Oreo cookie will work in this recipe as long as it’s not double stuffed.
- You can replace the milk chocolate chips with semi-sweet chocolate chips or dark chocolate chips.
- You can substitute the chocolate chips in this recipe for milk chocolate, semi-sweet, or dark chocolate baking chocolate.
- The butterfinger bars can be swapped out for the butterfinger bits that can be found in the baking aisle.
NOTE: This recipe has not been tested with other substitutions or variations

How to Make Butterfinger Ice Cream Pie
Chocolate Cookie Crust
This chocolate cookie crust doesn’t need to be baked. I added a little extra butter to help bind everything together. I use Oreo cookies and grind them up into crumbs using a food processor. You can also use a large storage bag and a rolling pin. It will take a little more time, but does the same job.

Add the cookie crumbs and butter together. It will look like a wet sand. Press it firmly into a 9 1/2 inch pie plate. Place the crust in the fridge until the ice cream is made and the crust is firm.
How to Make No-Churn Chocolate Ice Cream
No churn chocolate ice cream is quick and easy to make. It doesn’t require an ice cream machine. The 3 main ingredients for this ice cream are whipped cream, sweetened condensed milk, and cocoa powder. You can work in special little add-ins like bits of chopped up Butterfinger Bars, mini marshmallows, chopped nuts, M&Ms, etc.
I added some melted milk chocolate chips to my ice cream. I LOVE milk chocolate chips so I add them to most everything I intend on having chocolate in. I also feel like once the chocolate is chilled and able to set up, it gives the ice cream a little more stability. Stability is a good thing since whipped cream and whipped cream-based recipes aren’t really known for being long lasting desserts. They can separate and become a melty mess.

To get the melted chocolate added to the cocoa powder and condensed milk, stir the cocoa powder and sweetened condensed milk together until combined. Then, add the milk chocolate chips and microwave for 30 seconds and stir. If the mixture isn’t smooth, microwave for another 30 seconds and stir again.
Here’s the important part. Let the mixture cool! Stir it often while it’s cooling to prevent a chocolate crust from forming. That will leave your mixture slightly lumpy.
Once the mixture is cooled, fold that into your whipped cream. Add half of the mixture to the whipped cream and fold until fully combined and then fold in the remaining half.
Fold in some chunks of the candy bar too.

Assembling the Ice Cream Pie
For the Butterfinger Ice Cream Pie, I wanted to have little surprises throughout the pie. So, chunks of candy bars are folded in and swirls of peanut butter and chocolate syrup are added to the pie filling. It only takes a minute to do which is really nice.

Pour the ice cream into the pie plate. Don’t overfill the crust because the ice cream will spread and make a huge mess especially while you’re mixing in the add-ins while it’s in the crust.
Drizzle melted peanut butter and chocolate syrup on top and using a knife, skewer, or toothpick to swirl it around.
PRO TIP: You can also add the melted peanut butter into a sandwich bag and push the tip of the sandwich bag down into the ice cream filling and add pockets of peanut butter that way.

This is the perfect frozen pie. It’s easy to make and will be waiting in the freezer for that moment when you need it. It will cool you down on a hot day, cure a chocolate craving, and make every Butterfinger lover’s heart race. The candy keeps the crispy crunch, the peanut butter firms up, and the chocolate syrup drips out.

Can’t get enough? I also have an amazing recipe for easy no-bake butterfinger bites! They are incredibly addicting.
How to Store and Freeze
Once you decorate teh top of the pie, pop it in the freezer for about 1 hour until everything is firm. Then two layers of plastic wrap on top of the pie and a layer of heavy-duty tin foil. Place in the freezer for up to 2 to 3 months.
Recipe FAQs
Yes! You’ll need to let it soften some so you can work in the butterfinger bits, swirls of peanut butter, and chocolate syrup.
Yes! You’ll need 24 ounces of Cool Whip thawed.
You can, but it will be in a smaller pan than the 9.5 inch pie plate that we used so you will have extra filling that you’ll need to pop in a freezer-safe container to eat as ice cream.
If you try this recipe, be sure to leave a rating below and also share it on Instagram, and tag me! You can also find me on Facebook and stay up to date on recipe releases by joining the Newsletter!
Butterfinger Ice Cream Pie
SAVE THIS RECIPE
Ingredients
Crust
- 1 1/2 cups Oreo cookie crumbs about 25 cookies
- 6 tableIspoons butter melted
Ice Cream
- 2 cups heavy whipping cream whipped to stiff peaks
- 14 ounces sweetened condensed milk
- 1/2 cup unsweetened cocoa powder
- 1/2 cup milk chocolate chips melted
- 1 Butterfinger bar chopped
- 1/4 cup creamy peanut butter
- 1 tablespoon chocolate syrup
Toppings
- 1 cup heavy whipping cream
- 1/2 cup milk chocolate chips
- 1 tablespoon chocolate syrup
- 1 Butterfinger bar chopped
Instructions
Crust
- Add the Oreo cookies to a food process and pulse until the cookies are in fine crumbs.
- In a medium bowl, add in the Oreo crumbs and butter. Stir until it looks like wet sand.
- Firmly and evenly press into a 9 1/2 inch pie plate. Place into the fridge while working on the ice cream.
Ice Cream
- In a medium microwave-safe bowl, add the sweetened condensed milk and cocoa powder. Stir until combined.
- Add in the chocolate chips and place in the microwave for 30 seconds. Stir until the mixture is smooth. If there are still lumps, microwave for an additional 30 seconds and stir. Let cool to room temperature and stir the mixture often to avoid the chocolate forming a crust on top while it’s cooling.
- While the chocolate is cooling, add the whipping cream to a large mixing bowl. Beat with a hand mixer on medium speed until stiff peaks form.
- Fold about 1/2 cup of whipped cream into the cooled chocolate. This will lighten the chocolate mixture.
- Now pour the chocolate into the remaining whipped cream and fold until incorporated.
- Fold in the chopped Butterfinger.
- Pour the ice cream filling into the prepared cookie crust.
- Drizzle chocolate syrup and peanut butter on top of the ice cream pie and swirl in with a knife or skewer.
- Place in the freezer to chill until firm. This will take about an hour.
Topping
- For the chocolate whipped cream, add the chocolate chips and 2 tablespoons of whipped cream into a microwave-safe bowl. Microwave for 30 seconds and stir. Repeat microwaving for 30 seconds and stirring if the chocolate isn’t completely melted. Let the chocolate cool to room temperature.
- While the chocolate is cooling, place the remaining heavy whipped cream into a large mixing bowl. Beat with a hand mixer on medium speed until stiff peaks form.
- Add about 1/2 cup of the whipped cream into the cooled chocolate mixture and stir until combined.
- Pour the chocolate mixture into the whipped cream and fold until incorporated. Place into a piping bag fitted with a 4B tip and pipe shells and stars on the pie.
- Pipe shells and stars on the pie with the chocolate whipped cream.
- Add chocolate syrup and the chopped Butterfinger to the center. Freeze overnight until firm. Cut and serve!
Notes
Nutrition
(Nutrition facts are an estimate and not guaranteed to be accurate. Please see a registered dietitian for special diet advice.)

You had me at Butterfinger – my favorite candy bar! YUM!!! Thanks for sharing at our Merry Monday party – I’ll be featuring your ice cream pie at our upcoming party!
This recipe seems quite involved, but the finished ice cream looks and sounds soooooo amazing. Pinning because I seriously can’t wait to try. Have to unload the three tubs of ice cream in my freezer first… Don’t judge, hehe.
I recently started a new link up on my EyeLoveKnots blog, and would love if you came to link up! This month, I am sponsoring the giveaway of a pair of peacock earrings!
Alexandra of EyeLoveKnots
Super Crafty Sunday Link Up #4: http://eyeloveknots.com/2018/05/super-crafty-sunday-5-eyeloveknots-sponsored-giveaway.html