Coffee Cheesecake
This post may contain affiliate links. As an Amazon Associate I earn from qualifying purchases. Please read my disclosure policy.
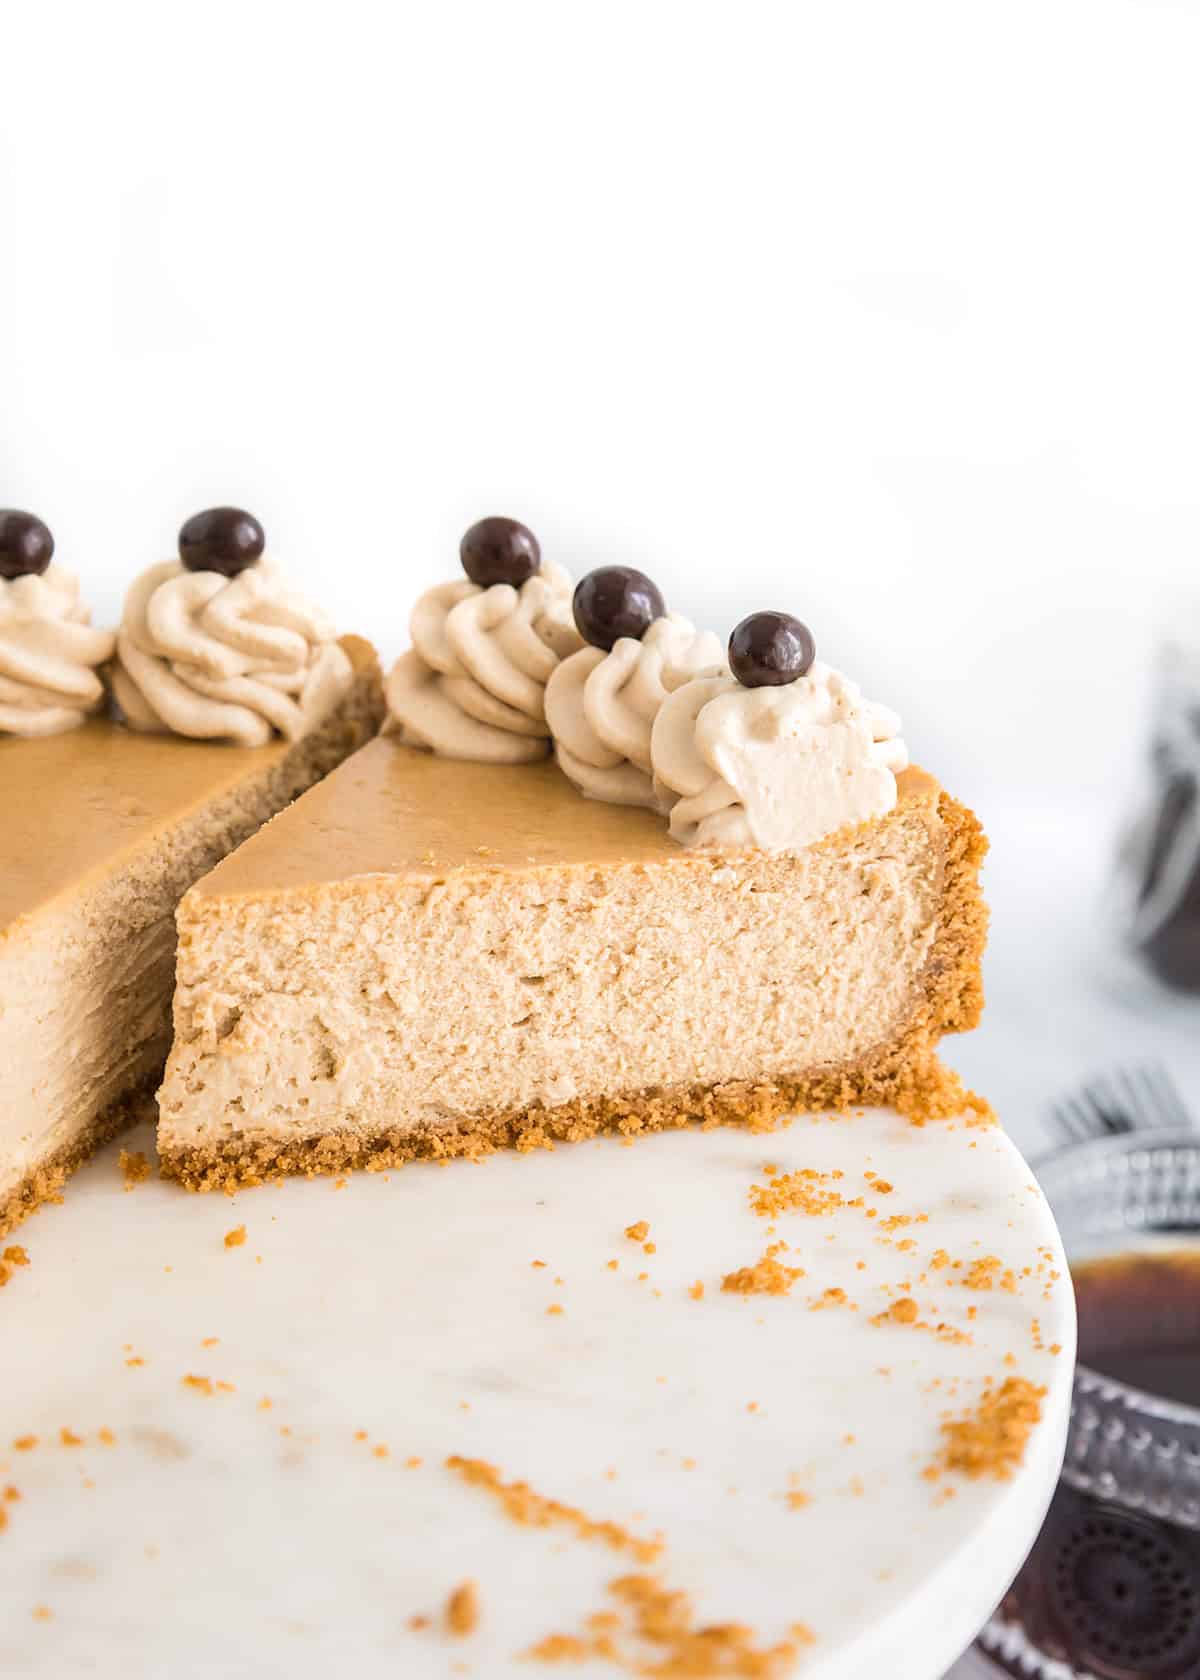
This baked Coffee Cheesecake recipe is packed full of coffee flavor. It’s rich in flavor and extra creamy. To finish the coffee cheesecake, I added coffee whipped cream and chocolate covered espresso beans. The best baked cheesecake recipe for coffee lovers!
It’s time to embrace your coffee love with this coffee cheesecake! Well that is, if you haven’t already. I’ve been sort of coffee crazy lately with coffee cookies, coffee cupcakes with coffee buttercream and coffee syrup so I can understand if you’ve given in already.
My hubby isn’t a huge fan of coffee treats, which is okay with me. It’s just more for my tummy, but I do share with my dad who can’t get enough of these sort of desserts. He’s the only person I know that can go through half a dozen coffee makers in a years time. That man lives off of coffee.
Ingredients

See the recipe card at the bottom of the post for all ingredients and quantities.
- Graham Cracker Crumbs – I buy the boxes of graham cracker crumbs for convenience, but I do think the sheets of graham crackers have a little more flavor to them. They’re simple to crush up too! Use two large storage bags to double bag the graham crackers and crush them with a rolling pin, a glass bottle, a can, whatever you have on hand.
- Cream Cheese – room temperature full-fat cream cheese is always best for cheesecake. Not all cream cheese is created equally, so grab a high quality cream cheese for the great flavor and make sure it’s full-fat because the high fat content helps with creaminess and stability.
- Instant Granulated Coffee – Use your favorite instant coffee. It’s mixed with a warm water so it can easily blend into the cheesecake batter where as just adding the instant coffee without first dissolving it would likely not melt into the batter.
- Sour Cream – Using full-fat sour cream has a thicker consistency than low-fat sour cream to help not thin out the cheesecake batter too much as well as provides a richer and creamier cheesecake. I use the Walmart brand Great Value and have been pleased with the results.
FREE EMAIL BONUS: Treat yourself with these delicious recipes
Substitutions and Variations
- You can substitute the graham cracker crust for an Oreo crust by crushing regular Oreos (not double stuffed) with the filling still in them and omitting the sugar.
- Use espresso powder instead of instant coffee granules for an extra kick of flavor!
- Top the cheesecake with a creamy chocolate ganache by microwaving ¾ cup semi-sweet chocolate chips and ½ cup heavy whipping cream in a microwave-safe bowl in 30-second intervals and stirring after each interval until smooth. Once the cheesecake is baked and cooled to room temperature, poor the ganache on top and place it in the fridge to set up.
NOTE: This recipe has not been tested with other substitutions or variations

How To Make Coffee Cheesecake
Before we start making anything, let’s get some prep work done first. Preheat the oven to 325 degrees F and lightly spray the sides of the springform pan.
PRO TIP: If you aren’t pushing the crust up the sides of the pan, I would recommend lightly greasing the sides of the springform pan with nonstick cooking spray and lay a 3-inch wide strip of parchment paper against the sides of the pan for the cheesecake to easily release from the sides.
Making the Graham Cracker Crust

Step 1: Add the crust ingredients into a bowl and stir until the butter coats the crumbs. When you grab a handful and squeeze, it should stick together. If it doesn’t, add 1 to 2 additional tablespoons of melted butter to the crust.
Step 2: Pour the crust into the prepared springform pan. Firmly and evenly work the crust on the bottom and up the sides of the pan, about 1 ½ inches up. You can place the crust in the oven to bake or in the fridge to chill until firm.
Making Coffee Cheesecake

Step 3: In a large bowl, beat the cream cheese and sugar using a hand mixer until smooth.
Step 4: Stir the instant coffee and water in a small bowl. Add it to the cheesecake batter along with the eggs one at a time until each is mixed in. Scrape down the sides and bottom of the bowl after each egg.
Step 5: Beat in the sour cream and heavy whipping cream just until incorporated. Don’t overmix, you’ll incorporate too much air into the cheesecake and it will rise and fall when it bakes up.
Step 6: Pour the batter into the prepared springform pan and prepare it for the water bath.
Water bath the Coffee Cheesecake
I’ve been making cheesecakes for a very long time now and very rarely do I ever not water bath a cheesecake.
I love to use a slightly larger silicone pan to place around my springform pan to protect it from water finding its way into my cheesecake. You can also use two layers of heavy-duty aluminum foil if you don’t have a silicone pan. My go-to heavy-duty aluminum foil is the great value brand from Walmart.
Now that the cheesecake won’t have any water leaking into it, grab an even bigger pan to place your silicone pan that has your springform pan in it. Fill the larger pan with about 1 inch of hot water.
Place the cheesecake into the oven and let it bake up.
Cooling the Cheesecake
DO NOT rush the cooling of the cheesecake. Let it slowly cool down in the hot oven with the oven turned off and the door of the oven propped slightly open. I like to fold an oven mitt in half and put it three-quarters of the way down the opening where the oven door and oven mitt to use as a stopper otherwise it gets slammed shut by a family member or animal almost every single time.
After it has cooled for AT LEAST 1 hour, place it on the counter to finish cooling completely. Once it has cooled completely, cover it with plastic wrap and pop it in the refrigerator overnight to firm up.

Tips for Success
How to Freeze Coffee Cheesecake
Once the cheesecake is fully baked and cooled, place it in the fridge overnight to firm up.
The next day, you can either freeze it in the pan or out of the pan. If you’re freezing it in the pan, wrap the cheesecake and pan tightly with two layers of plastic wrap and a layer of heavy-duty aluminum foil. Place it in the freezer for up to 3 three months.
If you want to freeze the cheesecake out of the pan, first make sure to add a parchment round in the bottom of the springform pan before baking to easily remove the cheesecake from the bottom.
Now place the chilled cheesecake in the freezer until solid while it’s still in the pan. Remove the sides and bottom of the pan and wrap it tightly in the two layers of plastic wrap and a layer of heavy-duty aluminum foil. Place it in the freezer for up to 3 months.
To thaw the cheesecake, place it in the refrigerator overnight. It will be ready to decorate and serve the following day.

Recipe FAQs
Yes! The cheesecake will be deeper than what’s pictured and may bake longer. To make sure it doesn’t overflow, use a 3 inch wide parchment paper on the sides of the pan or make sure the sides of your pan are 3 inches tall. You can also use a push bottom pan but be sure to lightly grease the sides of the pan to prevent them from sticking.
So, I didn’t use strong brewed coffee. I find that in most recipes, it’s too much liquid for the amount of coffee flavor I want. To fix that, I like to use instant coffee. It adds a lot less liquid and as much punchy flavor as you want. If you have a specific instant coffee that you prefer, use it.

This coffee cheesecake recipe post was originally published January 15, 2016. It’s been updated with more information and new photos.
If you try this recipe, be sure to leave a rating below and also share it on Instagram, and tag me! You can also find me on Facebook and stay up to date on recipe releases by joining the Newsletter!

Coffee Cheesecake
Ingredients
Crust
- 1 3/4 cups graham cracker crumbs
- 1 tablespoon granulated sugar
- 5 tablespoons butter melted
Coffee Cheesecake
- 24 ounces cream cheese room temperature
- 1 1/4 cups granulated sugar
- 2 tablespoons instant coffee crystals
- 2 teaspoons water
- 4 large eggs
- 1 cup full-fat sour cream
- 1/2 cup heavy cream
Coffee Whipped Cream
- 1 cup heavy cream
- 1 tablespoon instant coffee
- 1 teaspoon cold water
- 1/4 cup powdered sugar
- 12 chocolate covered espresso beans
coffee syrup garnish
Instructions
Crust
- Preheat oven to 325 degrees F. Spray the sides of the 9.5-inch springform pan with nonstick baking spray.
- In a mixing bowl, add the graham cracker crumbs, sugar and melted butter. Stir until the butter coats all the crumbs.
- Firmly press the crumbs evenly into the bottom and up the sides of the prepared pan.
- Either place the crust in the oven and let bake for 15 minutes or chill in the freezer or refrigerator until firm while you work on thecheesecake filling.
Cheesecake
- In a mixing bowl, add in the cream cheese and granulated sugar. Mix until completely incorporated. Scrape the sides and bottom of the bowl and mix again to avoid any lumps of cream cheese in your batter.
- In a small bowl, add in the instant coffee and water. Stir to combine.
- Add in the coffee mixture and then the eggs one at a time. Beat in each egg completely before adding the next. Scrape down the bowl after incorporating each egg.
- Add in the sour cream and heavy cream. Mix until incorporated.
- Just before adding the cheesecake mixture, wrap the outside of the springform pan with 2 layers of heavy-duty tin foil.
- Pour the cheesecake filling into the crust.
- Place the springform pan in a slightly larger baking pan. Fill the outer pan with 1 inch of water. This will keep the cheesecake from cracking.
- Place in the preheated oven and bake for 1 hour and 25 minutes or until done. To make sure the cheesecake is done, gently give it a wiggle. If it slightly jiggles in JUST the middle like jello, then it’s done. If it jiggles all over, it needs to bake longer. Turn off the heat and crack the oven door slightly. Let it cool in the oven for 1 to 2 hours until it reaches room temperature and then place in the fridge to chill overnight.
Whipped Cream
- In a mixing bowl, add in the heavy cream. Beat until soft peaks form.
- In a small bowl, add in the instant coffee and water. Stir to combine.
- Add in the coffee mixture and powdered sugar. Continue to beat until it becomes thick and stiff peaks form.
- Add the whipped cream into a piping bag with a 1M tip. Pipe 8 swirls on top of the cheesecake.
- Add a chocolate covered espresso bean to each swirl.
- Refrigerate until ready to serve. I suggest letting the cheesecake chill overnight.
- Slice the cheesecake and add a drizzle of coffee syrup.
Notes
Nutrition
(Nutrition facts are an estimate and not guaranteed to be accurate. Please see a registered dietitian for special diet advice.)

I love coffee flavour in any dessert, yet I don’t drink it, because I like it too sweet!
Question : a lot of your cheesecake recipes use a 9.5 inch pan, I only have a 9 inch. Would that work, or should I cut back the recipe by 1/4?
Also, I would love to be your editor… I’m very good at it, email me at antonia1cameron@gmail.com if you want to “talk”! Love all of your recipes!
Thanks Antonia! You can use a 9 inch cake pan with no problem- hope you enjoy this recipe!