Apple Crisp Cheesecake
This post may contain affiliate links. As an Amazon Associate I earn from qualifying purchases. Please read my disclosure policy.
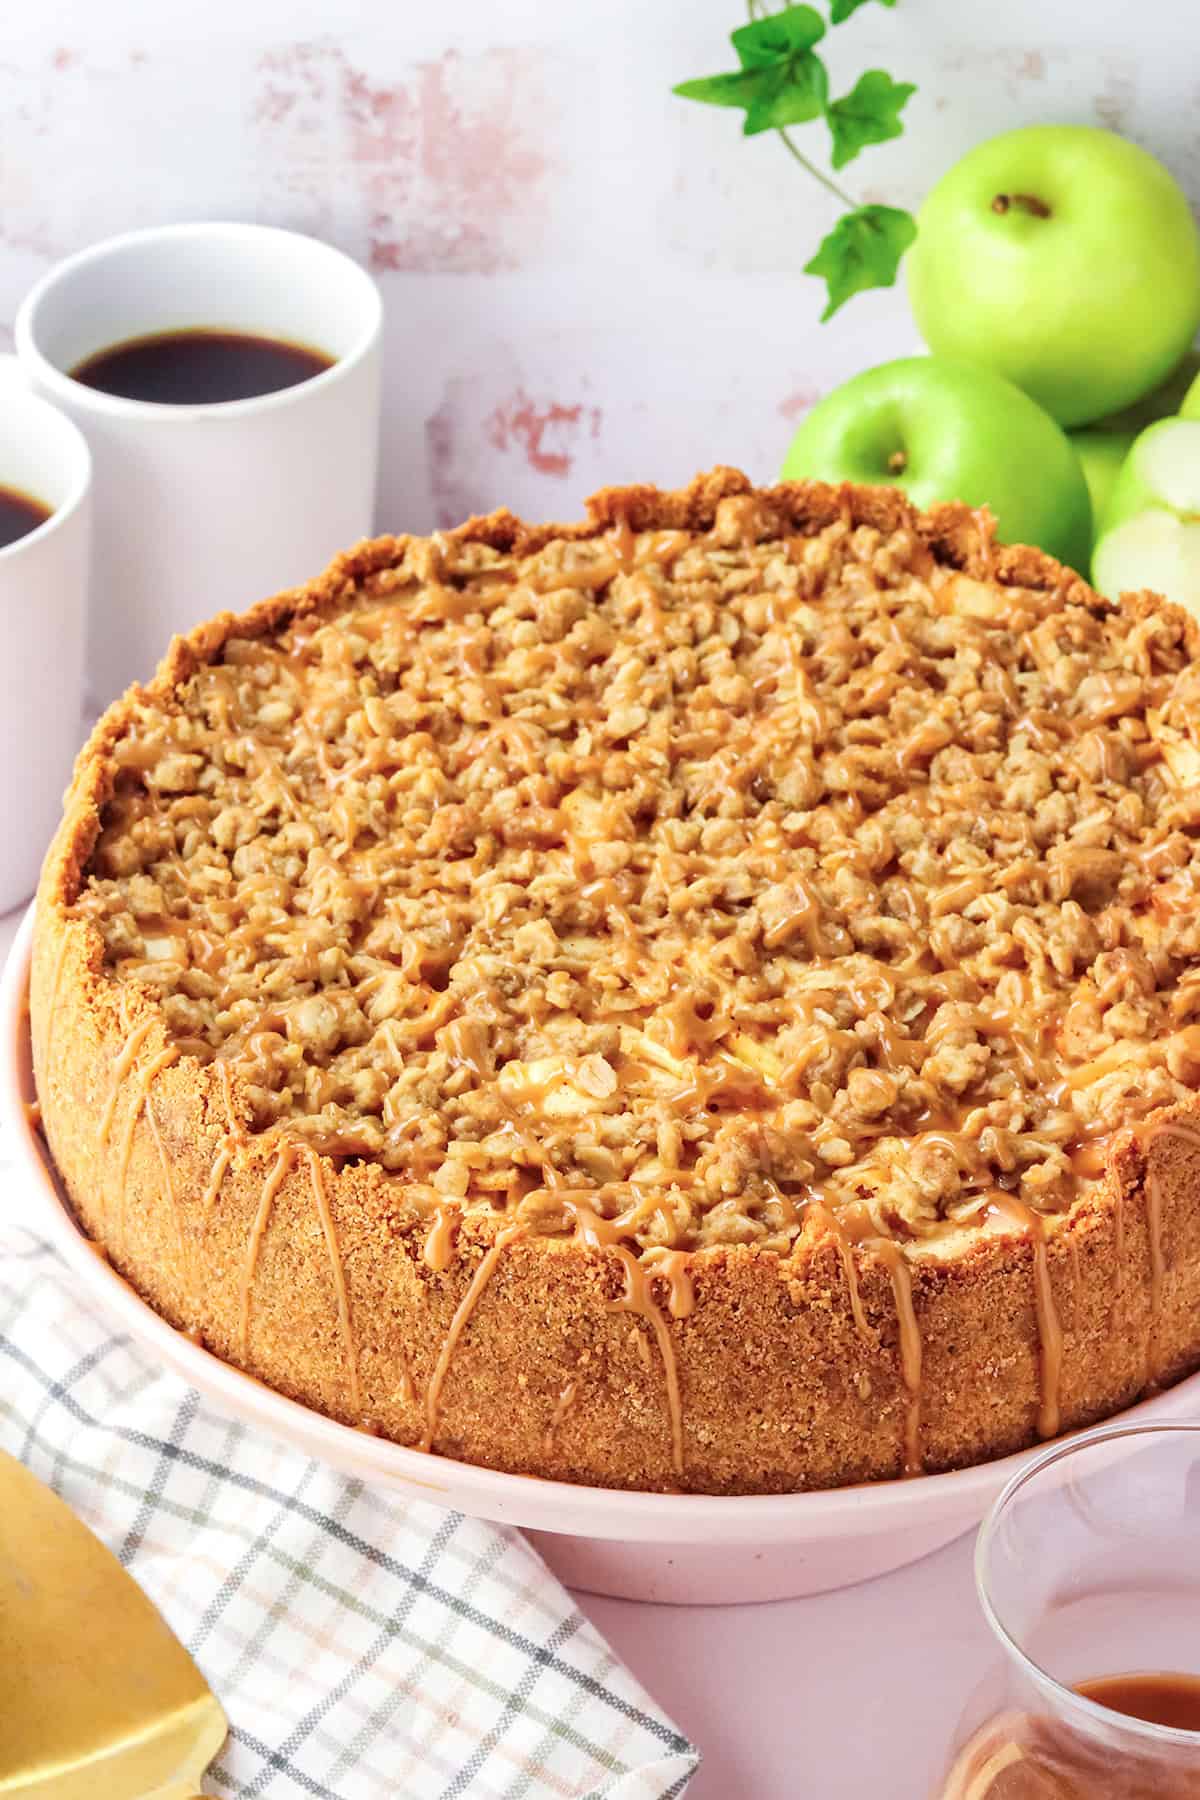
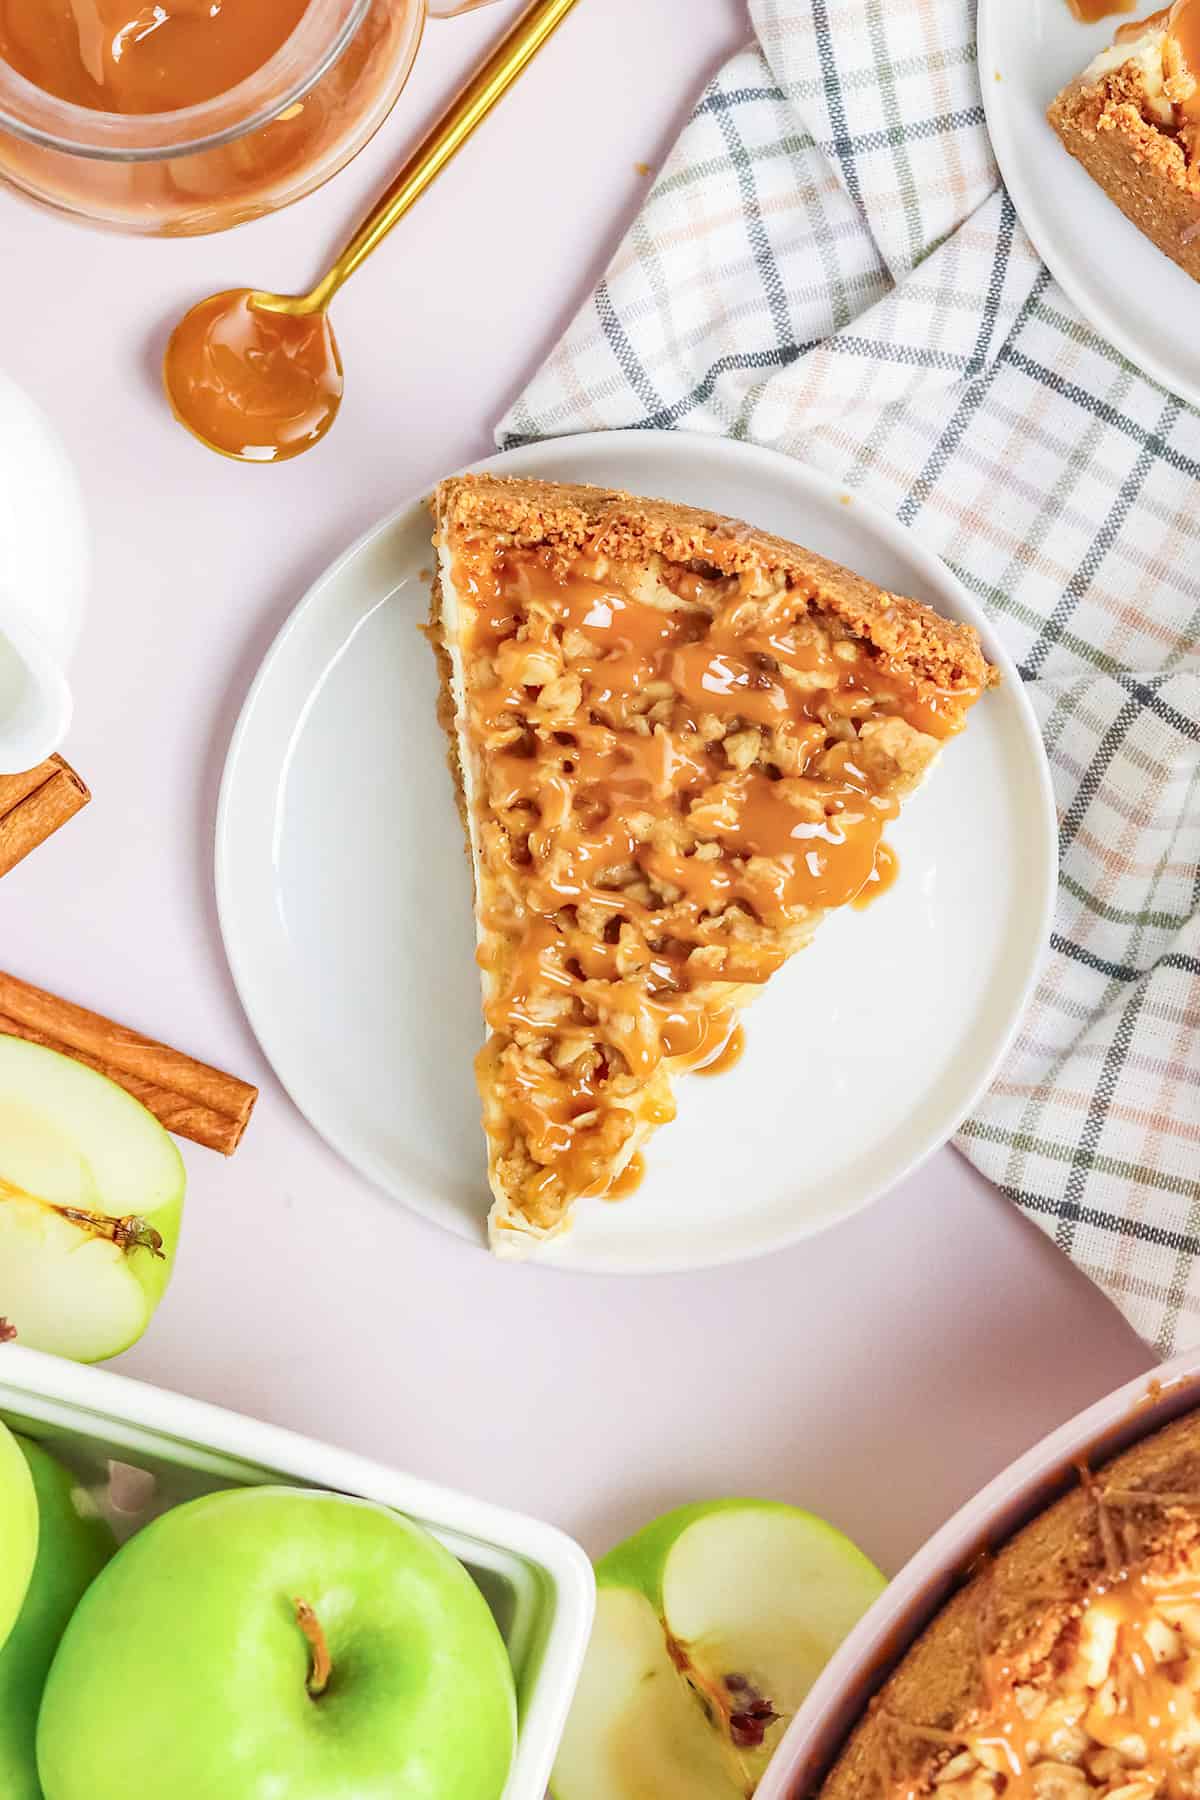
This apple crisp cheesecake is the perfect dessert when you can’t decide between an apple crisp and cheesecake. With layers of cheesecake, baked apples, and buttery crisp topping, it’s a delicious, easy, and luscious dessert that is crowd-approved. Here, you have the best of both worlds.

SAVE THIS RECIPE
You get that velvety smooth cheesecake with an apple crisp topping studded with real apples. It’s sweet and tart and has the perfect cinnamon-kissed flavor.
If you want more mouthwatering apple desserts, let me share a few more! Here is a classic apple fritter recipe, apple tacos, and a phenomenal apple pie.
Ingredients
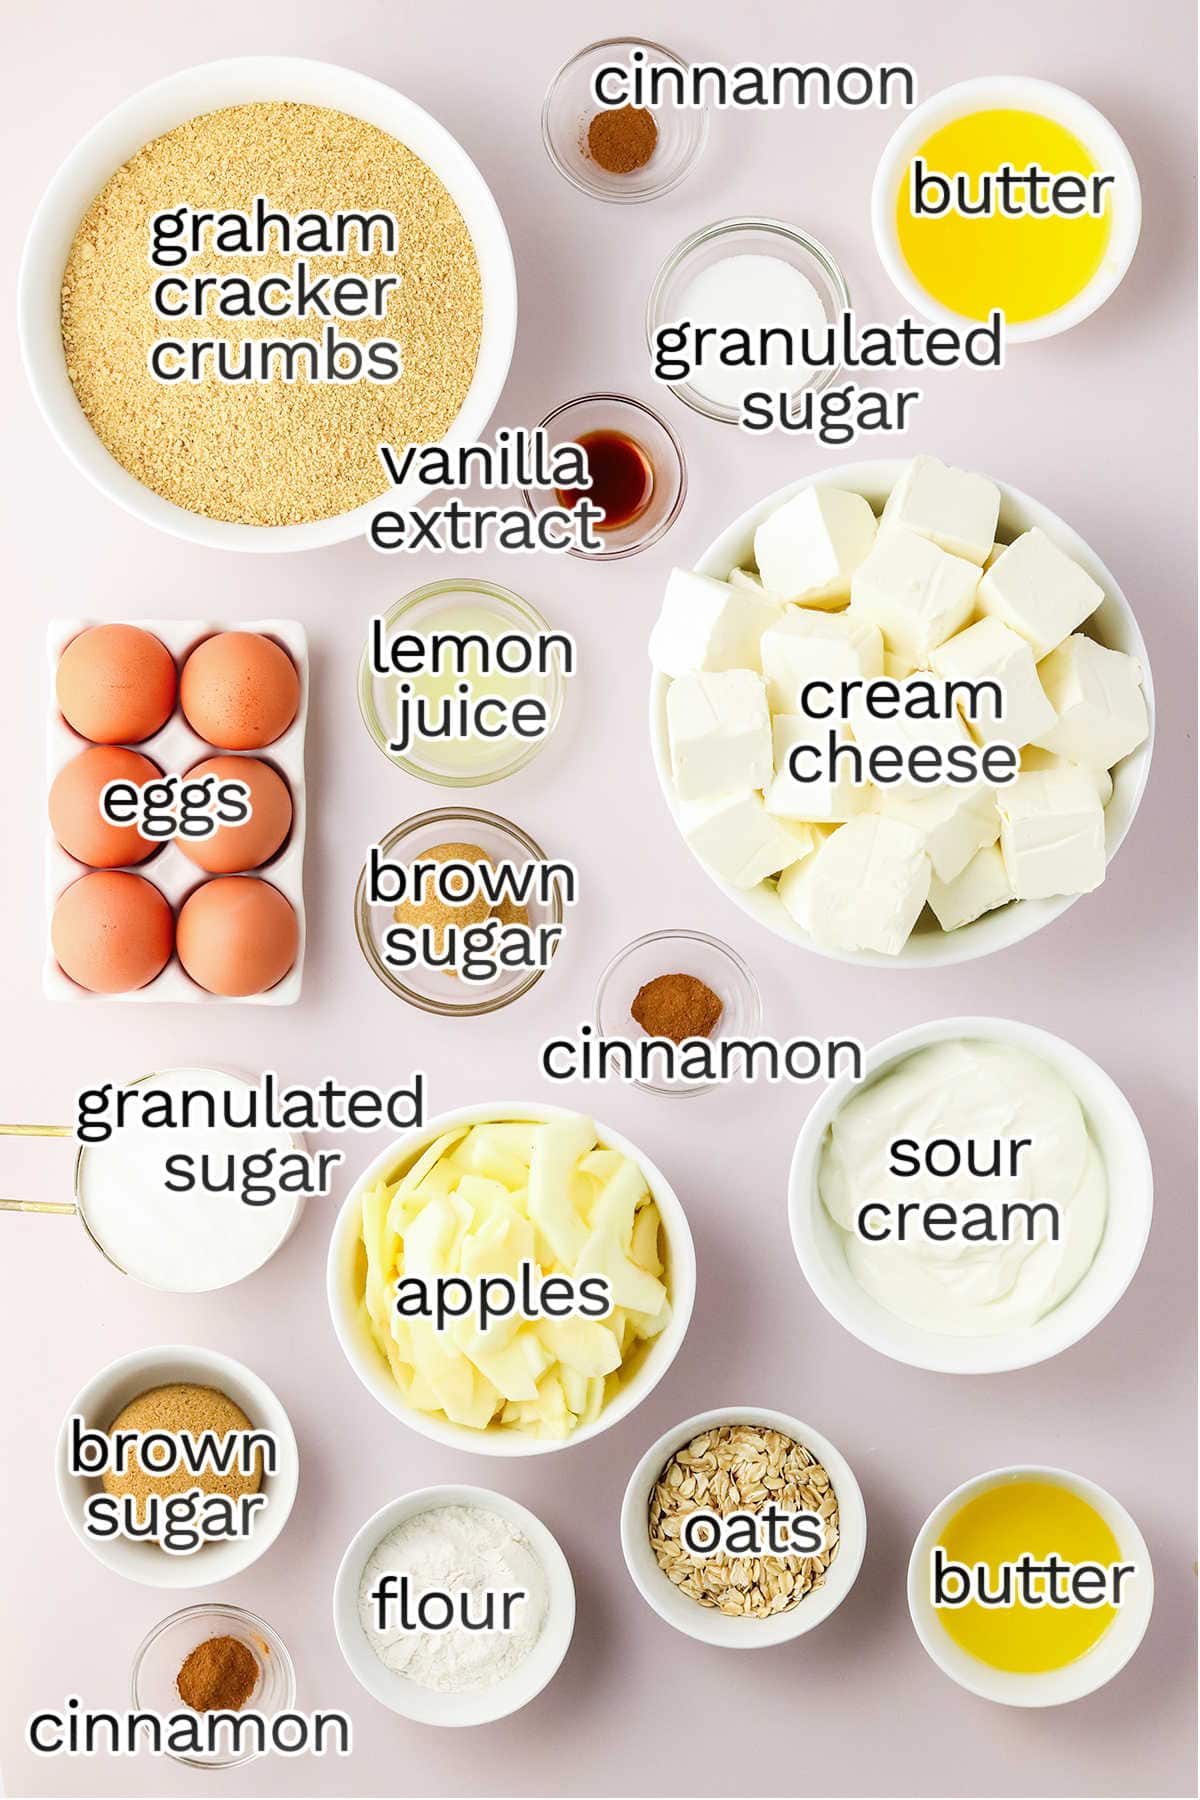
See the recipe card at the bottom of the post for all ingredients and quantities.
- Graham Cracker Crumbs: You will use golden graham cracker crumbs for the base of the crust. This will give you that buttery, crunchy crust.
- Cream Cheese: Ensure the cream cheese is softened and at room temperature. This will ensure that the cheesecake has a creamy texture.
- Lemon Juice: The lemon will act as an acidic component to enhance the flavor and add some tart.
- Sour Cream: Sour cream also adds a nice tangy flavor to the batter.
- Apples: Granny Smith apples are going to be used to help add a nice flavor to the cheesecake.
- Brown Sugar: Light brown sugar will help create a caramelized apple topping thickness.
- Oats: Old-fashioned oats are the best. This adds a nice, chewy texture.
- Caramel Sauce: This is used to drizzle over the top of the cheesecake.
FREE EMAIL BONUS: Treat yourself with these delicious recipes
Substitutions and Variations
- Apples: You are more than welcome to add in a different variety of apple, from Honeycrisp, Gala, Fuji, etc. Feel free to change up or do a mix of apples.
- Spices: To warm up the recipe, mix in some nutmeg and even a bit of apple pie spice.
- Nuts: Add chopped nuts to the topping for a nice crunch factor. Slivered almonds or even chopped pecans would be a great addition.
- Crust: For different-flavored crusts for your cheesecake, you can use vanilla wafers, gluten-free graham crackers, or even gingersnap cookies.
- Mascarpone Cheese: Use half cream cheese and half mascarpone cheese to create a different texture and flavor for the cheesecake.
NOTE: This recipe has not been tested with other substitutions or variations
Step-by-Step Instructions
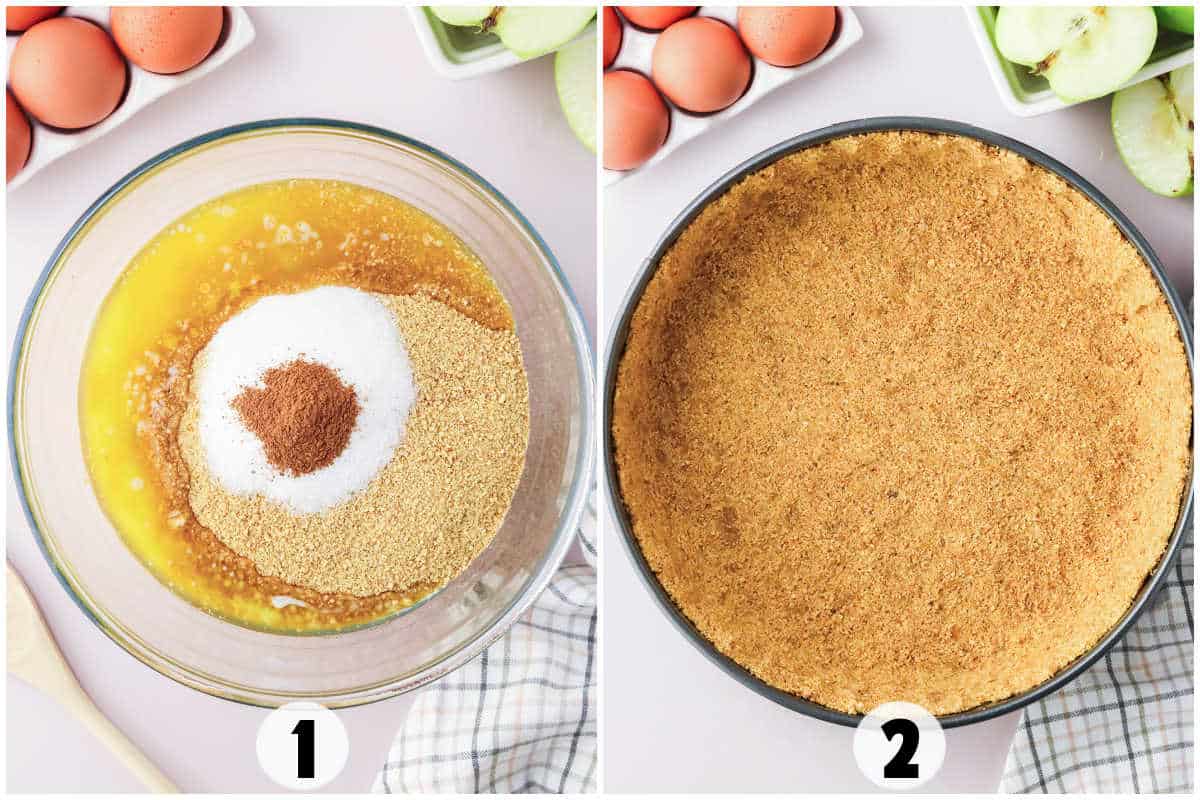
Step 1: Start by working on the cheesecake crust. Add your ingredients in a bowl and mix until it is a crumble mixture sand-like texture.
Step 2: Press the mixture into the bottom and up the sides of the springform pan. Use a measuring cup, bottom, or glass pressing into the pan. Bake as directed, and remove from the oven, and allow it to cool.
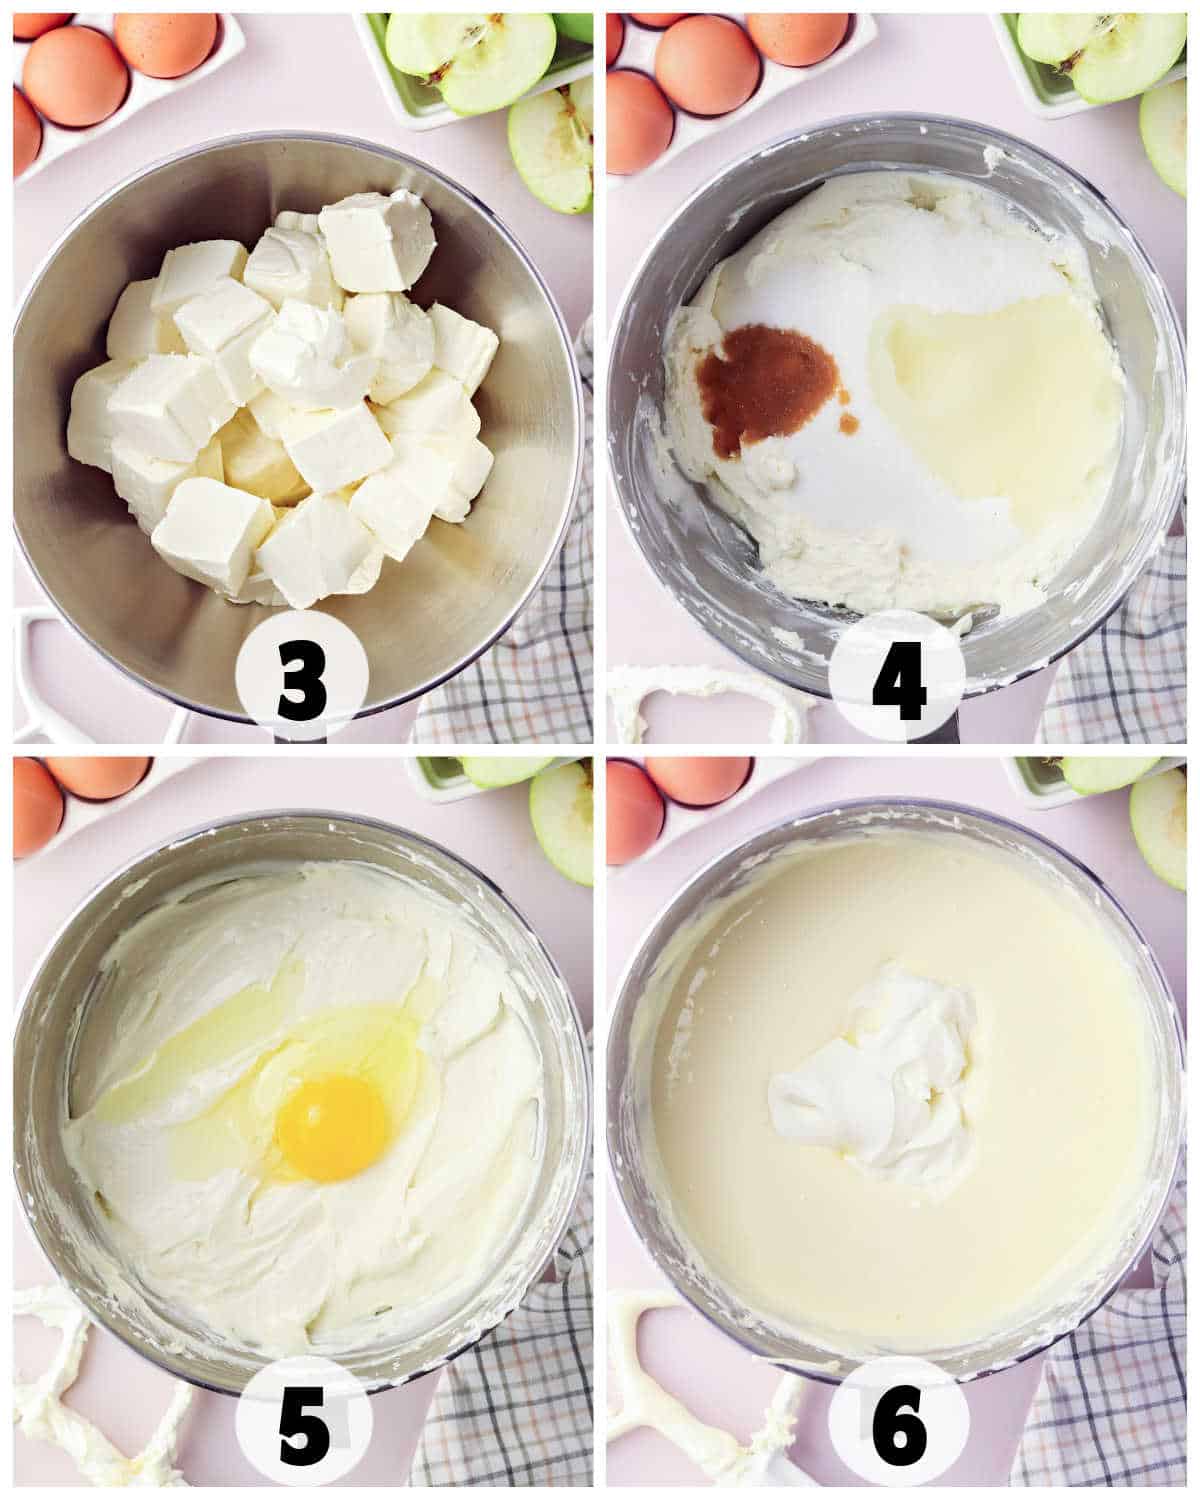
Step 3: Next, you will fork in the cheesecake filling. In a stand mixer, beat the cream cheese at medium speed. You want it to be ultra-creamy.
Step 4: Then add the sugar, lemon, and vanilla and mix to combine again, scraping down the sides.
Step 5: Work in the eggs one at a time on low speed. Mix to incorporate, but don’t overmix the batter.
Step 6: Then work in the sour cream. Pour the batter into the pan, and smooth out the top of the cheesecake evenly.
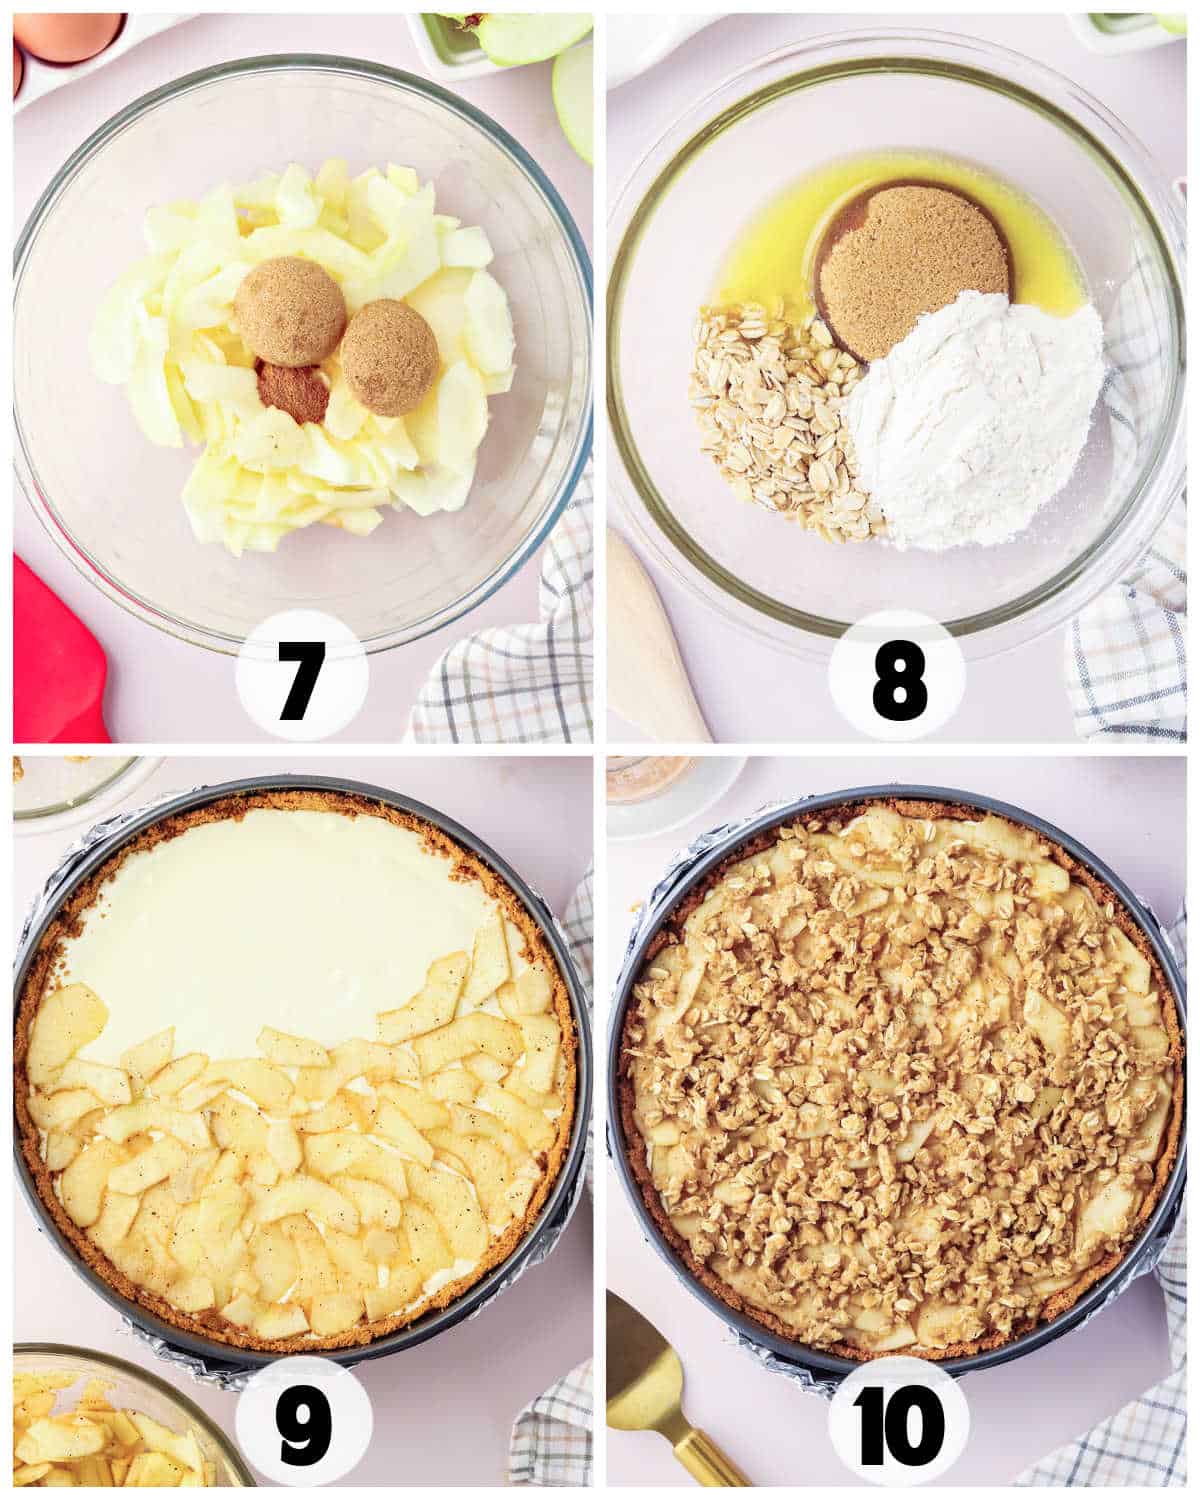
Step 7: Next, combine the apple topping ingredients in a bowl. Stir until the apples are coated.
Step 8: Work the crisp topping into a clumpy mixture in a bowl.
Step 9: Lay the apples evenly over the top of the cheesecake.
Step 10: Spread the crisp topping on the top of the layered apples.
Step 11: Boil water in a casserole dish and place it on the lowest rack of the oven. Then, place the cheesecake on the center rack and bake as directed.
Once done, let the cheesecake cool at room temperature, then refrigerate overnight.
Tips and Tricks
How to Store and Freeze
This cheesecake must be covered tightly in plastic wrap or foil or placed in an airtight container. It can be stored in the fridge for up to 4 days.
You can also freeze this apple crisp cheesecake for up to 3 months. Let the cheesecake cool completely and place into the freezer until it’s solid. This will take several hours up to a day. Once solid, wrap the cheesecake tightly in 2 layers of plastic, a layer of heavy-duty aluminum foil, and then place in a freezer container or bag.
Thaw in the fridge overnight before serving. You can also freeze the slices the same way.
Recipe FAQs
You are welcome to make the cheesecake without a water bath. Just know that there is a chance your cheesecake will most likely crack if you don’t.
If you lightly shake the pan, your cheesecake is done when the center has a very light jiggle. You can also stick a knife in the cheesecake, and it is done if it comes out clean of wet batter.
Yes, you can make this apple cheesecake a day before you would like to serve it up.
If you try this recipe, be sure to leave a rating below and also share it on Instagram, and tag me! You can also find me on Facebook and stay up to date on recipe releases by joining the Newsletter!

Apple Crisp Cheesecake
SAVE THIS RECIPE
Ingredients
Crust
- 2 cups graham crackers crumbs
- 2 tablespoons granulated sugar
- 1/2 teaspoon ground cinnamon
- 1/4 cup butter melted
Cheesecake
- 32 ounces cream cheese room temperature
- 1 cup granulated sugar
- 2 tablespoons fresh lemon juice
- 1 teaspoon vanilla extract
- 4 large eggs room temperature
- 1 cup sour cream
Apple Topping
- 2 cups (about 3 apples) granny smith apples peeled, cored and thinly sliced
- 2 tablespoons light brown sugar packed
- 1 teaspoon ground cinnamon
Crisp Topping
- 1/4 cup all purpose flour
- 1/4 cup light brown sugar packed
- 1/4 cup old fashioned oats
- 1 teaspoon ground cinnamon
- 4 tablespoons butter melted
- caramel sauce for serving
Instructions
Crust
- Preheat the oven to 350 degrees F. Move your oven racks so that one is in the middle position and one is in the lowest position. Line the bottom of a 10-inch springform pan with parchment paper.
- In a medium bowl, stir together the graham crack crumbs, melted butter, sugar and cinnamon. It will be crumbly but will stick together when pushed.
- Press the mixture into the bottom and up the sides of the springform pan. Use your fingertips, a glass or a measuring cup to push the mixture down. Place on the middle rack and bake for 15 minutes. Remove from the oven and set aside to cool. Reduce the oven temperature to 325 degrees F.
Cheesecake
- In the bowl to your stand mixer or in a large mixing bowl, add the cream cheese. Beat with the paddle attachment or a hand mixer on medium speed until smooth.
- Add the sugar, lemon juice and vanilla extract and continue beating on medium speed until combined. Scrape down the sides and bottom of the bowl.
- Add the eggs, one at a time, and beat on low until they are just mixed in. Scrape down the sides of the bowl before adding the next egg. You don’t want to over beat your batter at this point. Too much air in the batter will create cracks in your cheesecake.
- Add the sour cream and mix it in on low speed just until combined.
- Pour the cheesecake batter into the baked crust and smooth it out evenly.
- Wrap the bottom of the pan in a layer of tin foil.
Apple Topping
- In a medium bowl, stir together the sliced apples, brown sugar and cinnamon. Make sure the apples are fully coated.
- Carefully top the cheesecake batter with an even layer of sliced apples.
Crisp Topping
- In a small mixing bowl, add the flour, brown sugar, oats, cinnamon and butter. Mix until crumbly.
- Top the sliced apples with the crisp.
- Pour boiling water into a 9×13 pan and carefully place it in the oven on the lowest rack.
- Place the cheesecake on the middle rack in the preheated oven and bake for 1 hour. Do not open the oven door during baking. Once baking is done, turn off the oven but don’t open that door for 45 minutes. Once the 45 minutes has passed, prop open the oven door using a wooden spoon. Let it sit like this for another 30 minutes to begin to cool slowly.
- After the 30 minutes, it is safe to remove the cheesecake from the oven to a cooling rack.
- Once the cheesecake cools to room temperature (about an hour and a half), place in the fridge to chill for at least 4 hours or up to overnight.
- Run a knife around the outside edge, if needed and remove from the pan to a serving dish.
- Drizzle a little caramel sauce over the top and serve chilled.
Notes
Nutrition
(Nutrition facts are an estimate and not guaranteed to be accurate. Please see a registered dietitian for special diet advice.)